
Standard fence post spacing runs 6–8 feet on center for wood privacy and picket fences, up to 10 feet for chain link, and 10–25 feet for agricultural woven or high-tensile wire. Drop to 6 feet whenever you’re building tall, using heavy panels, working in soft soil, or fighting wind exposure, and never let spacing decisions override local frost-line depth requirements. Count posts with one formula: run length divided by spacing, plus one, then add extras for corners and gates.
TL;DR:
- Fence post spacing varies significantly by fence type, ranging from 6-8 feet for wood privacy fences to 10-25 feet for woven wire and high-tensile fencing, depending on terrain and use.
- Taller fences over 6 feet, soft or loose soil, and wind exposure require closer spacing of posts to maintain stability and prevent panels from racking or collapsing.
- Post depth should be about one-third of the overall post length, with a minimum of 18-36 inches depending on fence height, and must reach below the frost line when applicable.
- Corner, end, and gate posts need to be larger and set deeper than line posts to handle tension and wind loads, with wider footings recommended for wide gates.
- Proper planning includes measuring run length accurately, adjusting spacing for site conditions, and prioritizing sufficient posts, deep holes, and proper bracing to ensure long-lasting fences.
Table of Contents
- What is the right fence post spacing for different fence types?
- How does spacing change by fence type and height?
- Post depth, hole size, and frost-line rules
- Corner, end, and gate posts need their own rules
- Adjusting for soil, slope, and wind exposure
- How many fence posts do you need? Formula and worked examples
- Layout and installation steps before you dig
- Field notes: common mistakes and when to call a pro
- Prefab panels versus custom rail construction
- Prioritize structure over minimal material savings
- Get expert help with your fence installation
- Sources
- FAQ
What is the right fence post spacing for different fence types?
Spacing isn’t one-size-fits-all, and the fastest way to get it wrong is applying a chain link rule to a wood privacy fence. Here’s how the major fence types stack up, measured on center (post center to post center, not edge to edge).
| Fence type | Standard spacing | Tighten to 6 ft when… | Common panel widths |
|---|---|---|---|
| Wood privacy/picket | 6–8 ft | Fence exceeds 6 ft tall, panels are solid/heavy, soil is sandy or loose, or site is wind exposed | 6 ft, 8 ft |
| Vinyl/composite | Per manufacturer (usually 6 or 8 ft) | Manufacturer specifies it; deviating can void your warranty | 6 ft, 8 ft |
| Chain link (residential) | Up to 10 ft | Adding privacy slats or windscreens | N/A (rail-based) |
| Ornamental/aluminum | Panel-dependent, typically 6–8 ft | Pool code requires tighter picket gaps | 6 ft, 8 ft |
| Split rail | 8–10 ft | Rails are shorter stock lengths | 10 ft, 11 ft |
| Woven wire/high-tensile | 10–25 ft | Terrain is rolling or livestock pressure is high | N/A (wire tensioned) |
The through-line across every row: on-center measurement is non-negotiable. Measure from the center point of one post to the center point of the next, not from the inside or outside face. Get that wrong on a 100-foot run and your panels will either gap or crowd by the time you reach the end.
How does spacing change by fence type and height?
Wood privacy and picket fences default to 6–8 feet on center, and that range is backed by contractor and manufacturer guidance across most residential builds. Drop to 6 feet once you clear 6 feet of fence height, since taller panels catch more wind and put more leverage on each post. Heavy pickets (rough-sawn cedar boards, for instance, versus thin pre-fab panels) also push you toward the tighter spacing, and so does soft or sandy soil that won’t grip a post as firmly.
Vinyl and composite fencing plays by different rules entirely. These systems use engineered rails designed for a specific span, and the manufacturer’s spec sheet is the real authority here, not a general rule of thumb. Most vinyl privacy systems call for 6 or 8 foot spacing, but stretching a rail beyond its rated span can cause sagging or cracking, and it will likely void your warranty. Always check the product literature before you dig a single hole.
Chain link is more forgiving. Residential line posts commonly run up to 10 feet apart, a spacing rooted in ASTM F567 guidance that the industry has followed for decades. That’s the spacing for bare fabric, though. The moment you add privacy slats or a windscreen, you’ve effectively built a solid wall out of chain link, and the wind load calculations for wood privacy fencing start to apply. Terminal posts (the ones at corners, ends, and gates) also need to be larger diameter and set deeper than line posts, since they carry tension the line posts never see.
Ornamental and aluminum fencing tends to come in prefabricated panels, so your spacing is dictated by the panel itself rather than a general range. You’re not choosing 6 feet versus 8 feet here. You’re matching post placement to the panel’s actual centerline, and if the fence surrounds a pool, most local codes will also dictate maximum picket gap regardless of post spacing.
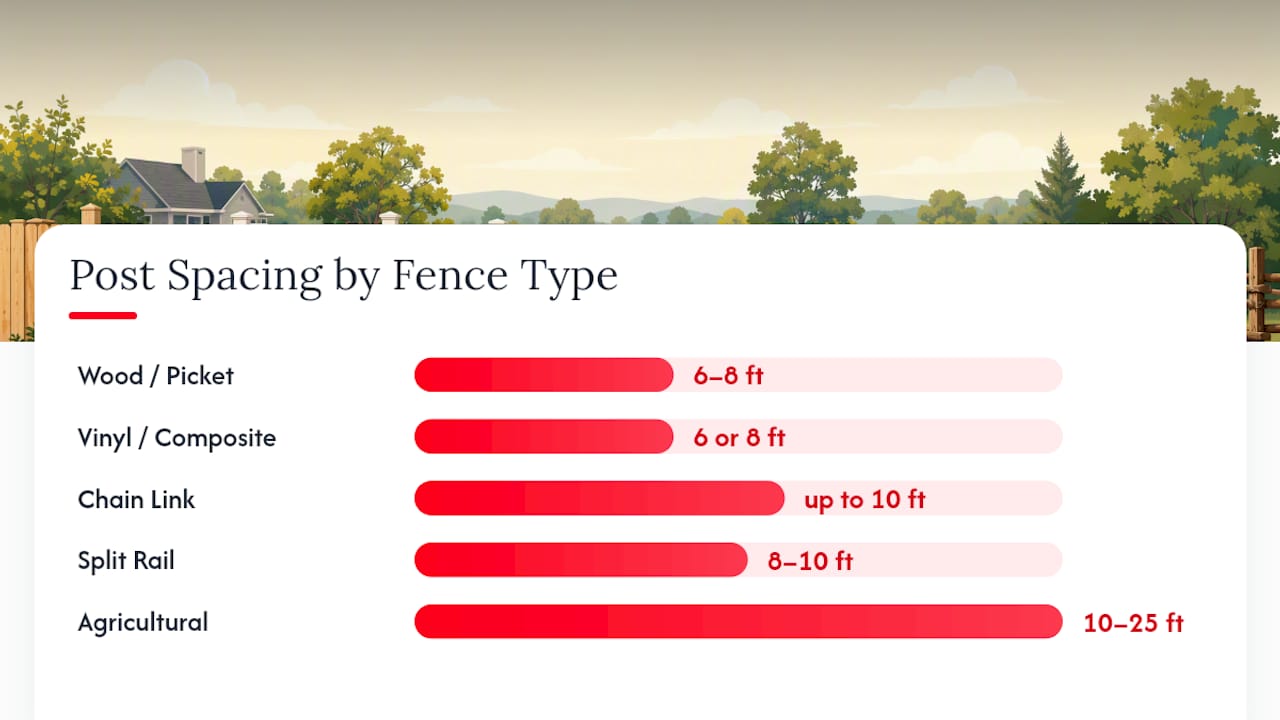
Split rail fencing runs 8 to 10 feet between posts, matched to standard rail lengths sold at most lumberyards. One thing people miss with split rail: it’s more vulnerable to frost heave than solid-panel fencing because the open design puts less weight on each post, and posts can work loose over a few freeze-thaw cycles if they weren’t set deep enough to begin with.
Agricultural fencing, whether woven wire or high-tensile, has the widest range of any category. Line posts can sit 10 to 25 feet apart depending on wire type, terrain, and what you’re containing. A few things drive that range:
- Tension level: high-tensile wire under proper tension can span the full 25 feet with droppers (lightweight spacers) holding the wire pattern between posts.
- Terrain: rolling or uneven ground needs tighter spacing to keep wire at a consistent height off the ground.
- Livestock pressure: cattle can push wire harder than sheep or goats, so cattle fencing often runs tighter than the maximum spacing.
- Bracing: every stretch of high-tensile wire needs proper end and corner bracing, since the wire itself pulls hard enough to bend an unbraced post over time.
Post depth, hole size, and frost-line rules
Depth matters as much as spacing, and it’s the part DIYers most often shortchange. The rule of thumb is roughly one-third of the total post length below grade. An 8-foot post, in other words, gets about 2 to 3 feet of embedment.
That rule has one hard override: frost line depth. If your region’s frost line sits deeper than the one-third rule would put your post, dig to the frost line instead. A post that doesn’t reach below frost depth will heave out of the ground over a few winters no matter how well you set it, and no amount of concrete fixes that problem after the fact.
- 3 to 4 foot fences: dig 18 to 24 inches deep, adjusted upward if your frost line runs deeper.
- 5 to 6 foot fences: dig 24 to 30 inches deep.
- 7 to 8 foot fences: dig 30 to 36 inches deep, and consider going deeper on exposed sites.
- Hole diameter: roughly three times the post’s width, so a 4×4 post wants a 10 to 12 inch diameter hole.
- Base layer: 4 to 6 inches of gravel under the post improves drainage and keeps water from pooling against the base, a common cause of rot in wood posts.
Pro Tip: A single 8 inch by 8 inch by 30 inch hole typically takes one to two 50 pound bags of concrete. Buy an extra bag or two per project. Running short mid-pour and mixing a second batch on the fly almost always shows as a visible seam once it cures.
Go deeper than the standard recommendation on sloped lots, in loose or sandy soil, in high-wind corridors, or anywhere you’re running posts taller than 6 feet. The extra digging costs you an hour. A leaning post costs you a weekend redoing it.
Corner, end, and gate posts need their own rules
Line posts carry vertical load. Corner, end, and gate posts carry lateral tension, wind pressure, and repeated stress from a swinging gate, which is a different job entirely and demands a bigger post.
- Go one size up from your line posts at every corner, end, and gate location. If your line posts are 4×4, your terminals should be 6×6.
- Set terminal posts deeper than line posts, and use a wider concrete footing to resist the pull.
- For agricultural high-tensile runs, install proper H-brace or N-brace assemblies at every end and corner, a practice USDA/NRCS field guidance treats as standard rather than optional.
- Wide gates (anything over 6 feet) need extra-large posts, often set in a footing twice the diameter of a standard line post hole, because the leverage from an open gate swinging in the wind is substantial.
Pro Tip: Contractors routinely oversize corner and gate posts and set them noticeably deeper than the rest of the run. It’s a small amount of extra material, and it’s the single most common thing that separates a fence that lasts decades from one that starts leaning within a year. For gate-specific sizing details, this gate post sizing guide walks through practical dimensions for different gate widths.
Adjusting for soil, slope, and wind exposure
Your spacing plan should never be copied blind from a chart. Site conditions push the numbers around, sometimes significantly.
- Soft or sandy soil holds posts less firmly, so tighten spacing or upsize post diameter to compensate.
- Wind-exposed sites (open lots, coastal areas, hilltops) benefit from 6-foot spacing on solid panel fences rather than the standard 8 feet.
- On slopes, measure spacing on the horizontal plane, not along the sloped ground surface, or your panels won’t fit as installed.
- Decide upfront whether you’re racking (angling each panel to follow the slope) or stepping (keeping panels level with a gap underneath) before you set a single post, since the two methods space posts differently on grade changes.
The wind math here is worth knowing because it’s concrete, not a vague suggestion. Tightening spacing from 10 feet to 8 feet cuts calculated wind load per post by roughly 20%, and tightening further to 6 feet cuts it by roughly 40% compared to the 10-foot baseline. That’s the actual mechanism behind “go tighter in windy spots.” Fewer square feet of panel per post means less force each individual post has to resist. If you’re building on an exposed ridge or a coastal lot, this wind-resistant fence spec guide breaks down additional adjustments worth making before you finalize a layout. And if your yard slopes, this guide to fencing on a slope covers the layout adjustments in more detail.
How many fence posts do you need? Formula and worked examples
The counting formula is simple: posts = (total run length ÷ spacing) + 1. Then add posts for every corner, and add 2 posts per gate opening (one on each side).
- Measure your total run length. Walk the fence line with a tape measure or measuring wheel and get the actual linear footage, including any turns.
- Divide by your chosen spacing. A 96-foot straight run at 8-foot spacing gives you 12 spans, which needs 13 posts (12 + 1).
- Switch spacing and compare. That same 96-foot run at 6-foot spacing needs 17 posts (16 spans + 1), four more posts for the tighter, sturdier layout.
- Add for corners and gates. Each 90-degree corner needs one shared post at the turn; each gate opening needs 2 dedicated gate posts.
- Build in a buffer. Add 5 to 10% extra posts and concrete to the order to cover a bad hole, a cracked post, or a measurement you missed on the first walk.
- Estimate concrete separately. Budget roughly 1 to 2 bags of 50 pound concrete mix per standard post hole, more for oversized corner and gate footings.
One caveat that trips up a lot of first-time DIYers: if you’re using prefab panels, don’t round your spacing to a clean number. Measure the actual panel width first, then set your posts to match the panel’s centerline. A panel built for 71 inches won’t magically fit an 8-foot gap just because that’s the number you had planned. For a full breakdown of how post count and panel count affect your project budget, this fence installation cost guide is worth a look before you place a material order.
Layout and installation steps before you dig
Getting spacing right on paper means nothing if your layout in the yard drifts. A few tools and a set sequence keep the numbers you calculated actually true on the ground.
Tools you’ll want on hand:
- String line and stakes or batter boards to mark the fence path
- A tape measure (25 foot minimum for residential runs)
- A line level or builder’s level to keep your string true
- A post-hole digger or gas auger, depending on soil and run length
- Temporary bracing to hold posts plumb while concrete cures
Sequence that works:
- Confirm your property lines and pull any required permits before marking anything.
- Set and brace your terminal posts (corners, ends, gates) first, since everything else references them.
- Run a string line between terminals and measure your on-center spacing along that line.
- Dry-fit a panel or rail section against your marks before digging, to catch spacing errors while they’re still cheap to fix.
- Dig, set, plumb, and brace each post before moving to the next.
Pro Tip: Call 811 at least a few business days before you dig, anywhere in the country. It’s a free service that marks buried utility lines, and skipping it is how DIYers end up with a severed cable line and an expensive repair bill on day one.
Field notes: common mistakes and when to call a pro
After two decades building fences, decks, and retaining walls, the Action Fence and Deck crew sees the same handful of failures over and over. Under-spacing on windy lots is common, where a homeowner used 8-foot spacing on an exposed hilltop and watched panels rack within two seasons. Shallow post holes are another repeat offender, especially when someone dug to a chart depth without checking the local frost line. Undersized gate posts show up constantly too, usually on wide double gates where the hardware and swing weight demand a bigger post than the line posts nearby.
Some jobs are worth handing off. Complex grade changes, long runs over rocky or heavily compacted soil, wide double gates, and any project that needs permit navigation are all situations where a professional crew’s experience saves real time and rework. A free on-site quote can quickly tell you whether your project is a straightforward weekend build or one that benefits from professional hands.
Prefab panels versus custom rail construction
Prefab panels and custom-built rail fencing solve the spacing problem in opposite directions, and picking the wrong one for your project creates headaches down the line.
With prefab panels, the panel width sets your spacing, not the other way around. Panels typically ship in 6 or 8 foot widths, and your post spacing has to match that width exactly, since the panel is a rigid unit that won’t stretch or compress to fit a gap you didn’t plan for. The upside is speed. You’re not cutting custom rails on site, and installation for a straight run goes quickly once terminal posts are set. The downside is inflexibility: an odd-length run (say, 103 feet) will almost always leave you with one shorter panel that needs trimming or custom framing at the end.
Custom rail construction flips that constraint. You build the rail spans on site, which means you can adjust spacing to whatever the terrain, wind exposure, or aesthetic calls for, inside the practical structural range for your rail material. That flexibility costs you time and requires more on-site measuring and cutting, but it’s the better choice for irregular lot lines, sloped terrain, or any run where a fixed panel width just won’t land cleanly on your corners and gates.
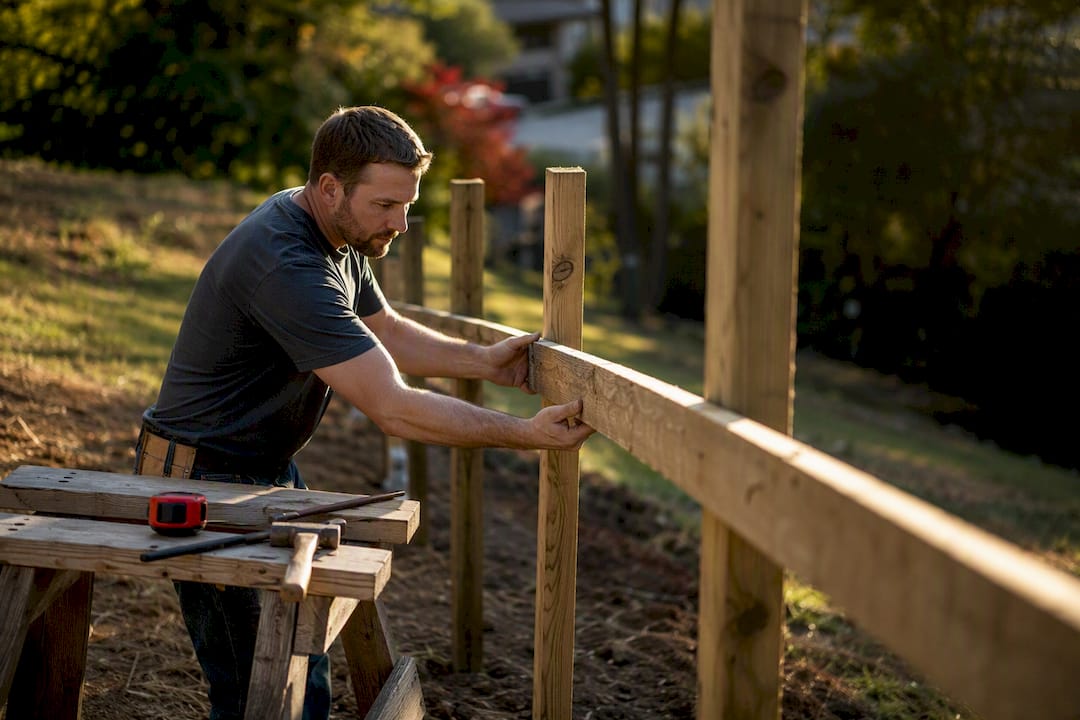
If you’re deciding between the two, walk your fence line first and check how evenly a standard panel width divides into your total run. A close, even division favors prefab. An awkward remainder favors custom rail work, or at least a mixed approach with custom-built end sections.
Prioritize structure over minimal material savings
The biggest mistake in fence planning isn’t picking the wrong spacing number. It’s treating spacing and depth as places to save a little money. A fence that racks in a windstorm because you stretched spacing too far costs you the whole rebuild.
Longevity comes from unglamorous decisions: enough posts, deep enough holes, and terminal posts sized for the tension they’ll actually carry. None of that shows up in a finished photo, but all of it determines whether the fence is still standing in year fifteen. Measure your run, pick a spacing based on fence type and site exposure, then confirm your footing depth against local frost line before you touch a shovel.
— Abraham
Get expert help with your fence installation
You can find a genuine alternative to guessing your way through spacing calculations and frost-line research: a licensed crew with experience to help ensure your fence is built correctly from the start.

Whether you need custom wood fencing, gate installation and repair, concrete footings poured to the correct depth for your region, or a complete fence build from layout to finish, the full range of fencing solutions covers the work most DIYers eventually decide to hand off, especially on long runs, wide gates, or sloped lots. An on-site assessment identifies actual soil conditions, frost depth, and wind exposure instead of relying on a general chart, and quotes can be provided with no obligation. If your project involves a corner, a gate, or terrain that isn’t flat and forgiving, consider requesting a quote to get a spacing and footing plan built around your specific yard.
Sources
- How Far Apart Should Fence Posts Be? | Family Handyman
- Fence Post Depth & Spacing: The Complete Technical Guide | FenceCalc
FAQ
How far apart should 4×4 fence posts be?
For most wood fences using 4×4 posts, standard spacing is 6 to 8 feet on center, tightened to 6 feet for fences over 6 feet tall or in windy locations. The exact spacing also depends on panel width, so measure your actual panels before finalizing post locations.
How far apart should 6×6 fence posts be set?
6×6 posts are typically used as corner, end, or gate posts rather than standard line posts, and they follow the same spacing logic as the line posts they anchor. They’re set one size up from line posts specifically to handle the extra tension at turns and openings, with deeper embedment and a wider concrete footing.
How deep should a post be for an 8 foot fence?
An 8-foot fence generally needs a post hole 30 to 36 inches deep, following the general rule of setting roughly one-third of the total post length below grade. If your region’s frost line runs deeper than that, dig to the frost line instead, since that depth always takes priority over the standard ratio.
How many posts do I need for 100 feet of fence?
At 8-foot spacing, a 100-foot run needs about 13 posts using the formula of (length ÷ spacing) + 1, plus additional posts for any corners or gates. At tighter 6-foot spacing, the same run needs more posts due to the reduced spacing, so it’s worth calculating both before ordering materials.
Does chain link fence spacing work the same as wood fence spacing?
No. Chain link line posts commonly space up to 10 feet apart, wider than the 6 to 8 foot range typical for wood privacy fencing, because bare chain link fabric carries far less wind load than a solid panel. Adding privacy slats or a windscreen to chain link changes that math, and spacing should tighten toward wood-fence ranges once the fabric is no longer see-through.