A terraced retaining wall splits a steep slope into a series of smaller walls to create usable benches and slow erosion, but drainage and permit limits decide whether this becomes a weekend project or a job for an engineer. Get those two factors wrong and even a well-built tier system can fail within a few seasons.
TL;DR:
- Proper drainage and permit considerations are critical; failure to address them can lead to wall failure within a few seasons.
- Bench width should be at least equal to the height of the supporting lower wall to prevent overloading and instability.
- Using materials like segmental concrete blocks or geogrid-reinforced MSE walls can improve stability, but drainage behind the wall remains essential.
- Constructing multiple tiers involves additional joints, drainage points, and careful spacing to avoid global instability.
- Regular inspection and maintenance of drainage systems, joints, and soil slopes are necessary to ensure long-term terrace stability.
Table of Contents
- Why homeowners choose tiered walls over one tall wall
- Setback, bench width, and the offset rules that keep tiers stable
- Choosing a material: block, timber, stone, or reinforced earth
- The drainage details that decide whether a terrace lasts
- Permits, engineering thresholds, and who to hire
- How a terraced wall gets built, start to finish
- Soil prep and backfill: the work nobody sees
- Keeping an eye on your terraces over time
- What terraced walls actually cost and why
- Common construction mistakes that lead to failure
- What 20 years of building walls teaches you about failure
- Get a free quote for your terraced wall project
- FAQ
- Sources
Why homeowners choose tiered walls over one tall wall
Instead of one towering wall holding back an entire hillside, a tiered system breaks the slope into flat, usable steps. That changes what a yard can do, not just how it looks.
- Flat benches turn a steep slope into space for planting beds, seating areas, or a path between levels.
- Shorter walls slow runoff at each step instead of letting water gain speed down a single long face, cutting erosion along the way.
- A staircase of low walls reads as part of the landscape rather than a wall, which matters on front-yard slopes facing the street.
- Terraces show up most often on backyard slope conversions, steep front lawns being reclaimed for use, and hillside lots where a single wall would need to be unreasonably tall.
The tradeoff is more joints, more drainage points, and more decisions to get right, each of which carries its own failure risk if skipped.
Setback, bench width, and the offset rules that keep tiers stable
Before sketching tier heights, a few numbers decide whether the design holds up over time.
- Set bench width at least equal to the height of the lower wall below it, a baseline used in county terracing guidance.
- Treat two tiers as one combined structure for permit purposes once the horizontal gap between them gets narrow, since inspectors commonly add the heights together.
- Check the offset distance between tiers against a formula tied to wall height and soil friction angle, the approach described in the tiered MSE and block wall design methodology developed for TxDOT. Wide enough offsets let each tier act independently; narrow ones force a global stability check across the whole system.
- Think of the “one third” idea in plain terms: a lower tier generally should not be so short relative to the tier above it that the upper wall’s load effectively sits right on top of the lower one. It is a proportion check, not a formula to memorize.
Bench width is generally recommended to be at least equal to the height of the lower supporting wall below it, according to Snohomish County’s retaining wall and terracing guidance. That single ratio does more to prevent overloading between tiers than almost any other design choice homeowners make on their own. Anything beyond two low tiers on decent soil is worth a geotechnical or civil engineer’s eyes before construction starts.
Choosing a material: block, timber, stone, or reinforced earth
Material choice drives cost, lifespan, and how forgiving the wall is of minor drainage mistakes.
- Segmental concrete block interlocks and battens slightly backward with each course, which helps stability on residential terraces, though small retail blocks have limited use once a wall climbs beyond typical low heights or carries a surcharge load, a caution noted in county guidance on modular systems.
- Timber costs less upfront and looks at home in a garden setting, but rot and insect damage usually shorten its service life compared with masonry, making it a better fit for low, short-term terraces than permanent hillside structures.
- Rockeries and gravity stone drain well naturally and look like part of the land, but stacked stone without engineering is not always a true structural retaining wall once loads get significant.
- MSE walls with geogrid reinforcement handle larger, multi-tiered systems and tricky soils, extending reinforcement layers back into the slope to carry the load that a gravity wall alone cannot.
Whichever material gets chosen, drainage behind it matters more than the face. A beautiful block wall with clogged weep holes fails the same way a cheap timber wall does.
The drainage details that decide whether a terrace lasts
Poor drainage causes more retaining wall problems than any other single factor, according to research on maintainable drains for earth retaining structures from Iowa State’s Center for Transportation Research and Education. Water trapped behind a wall adds pressure the structure was never designed to carry, and conventional weep holes tend to clog over time and lose capacity.
A drainage plan worth asking a contractor about typically includes:
- Free-draining backfill directly behind the wall face, not native clay or topsoil.
- A perforated pipe at the base, wrapped or bedded in gravel, to carry water to a safe outlet.
- A geotextile filter fabric separating backfill from native soil to stop fines from clogging the drain over time.
- Maintainable conical drains or removable face-drain inserts, which the CTRE research found outperform fixed weep holes because they can be cleaned out rather than replaced.
- Surface grading that directs runoff away from the top of each tier instead of letting it sheet down the wall face.
Pro Tip: Keep heavy compaction equipment at least 3 feet back from the wall face; compacting too close can push lateral pressure into the wall before the backfill has a chance to settle naturally.
Permits, engineering thresholds, and who to hire
Most U.S. jurisdictions require a permit and engineered plans once a retaining wall’s total height exceeds certain common thresholds around four feet, a threshold reflected in Snohomish County’s retaining wall rules and common across other counties. The catch for terraces: closely spaced tiers often get counted together toward that 4-foot figure, so two 3-foot walls stacked a few feet apart can trigger the same review as one 6-foot wall. Our guide to retaining wall height limits covers how that threshold typically gets applied.
Once a project crosses that line, plan reviewers generally ask for a predictable set of documents, similar to the items listed on Los Angeles County’s retaining wall plan review checklist:
- A soils report describing bearing capacity and soil type at the site.
- Structural calculations showing the wall resists sliding and overturning with an adequate safety margin.
- Drainage routing details showing where water goes once it leaves the wall system.
- Footing dimensions and reinforcement details for the base of each tier.
A landscape or retaining-wall contractor can usually handle a single low terrace on stable soil. Anything with multiple tiers, soft or expansive soil, or a total height near the permit threshold calls for a geotechnical or civil engineer before the first shovel goes in the ground.
How a terraced wall gets built, start to finish
A typical terrace project follows a predictable sequence, even though timelines stretch or shrink with site conditions.
- Clear the slope of vegetation and debris, then grade a rough working platform for the lowest tier.
- Excavate and level a footing trench for the base course, checking it with a level across its full length.
- Install the drainage system (pipe, gravel, and filter fabric) before any backfill goes in.
- Build the first tier, backfilling in thin, compacted layers as the wall rises.
- Repeat grading, footing, drainage, and wall-building for each successive tier above it.
- Finish with topsoil, planting, and surface grading once the final tier is complete.
Simple two-tier backyard projects on stable soil often wrap up relatively quickly; rocky ground, high water tables, or permit review can stretch that timeline considerably. Hidden costs tend to come from hauling away excavated soil, removing buried rock, locating utilities before digging, and occasionally redoing sections where compaction was rushed. When comparing quotes, look for itemized drainage components, any engineered details called for by the permit, and a clear warranty on workmanship, not just materials. Our breakdown of typical retaining wall costs walks through how those line items usually add up.
Soil prep and backfill: the work nobody sees
The backfill behind a terraced wall does more structural work than the face material in front of it, which is why soil preparation deserves as much attention as the blocks or timbers themselves.
Start by removing topsoil and organic material from the base of each tier down to stable subgrade, since organic matter compresses unevenly over time and creates settling that cracks joints and tilts courses. Compact the subgrade itself before placing any backfill, using a plate compactor on granular soils or a sheepsfoot roller on clay-heavy ground.
Backfill in lifts, typically 6 to 8 inches of material compacted before adding the next layer, rather than dumping the full depth and compacting once at the top. Thin lifts compact more evenly and avoid the air pockets that let soil settle unpredictably months later. Use a free-draining material like crushed stone or sandy gravel directly behind the wall, reserving native soil for areas farther back from the structure where drainage matters less.
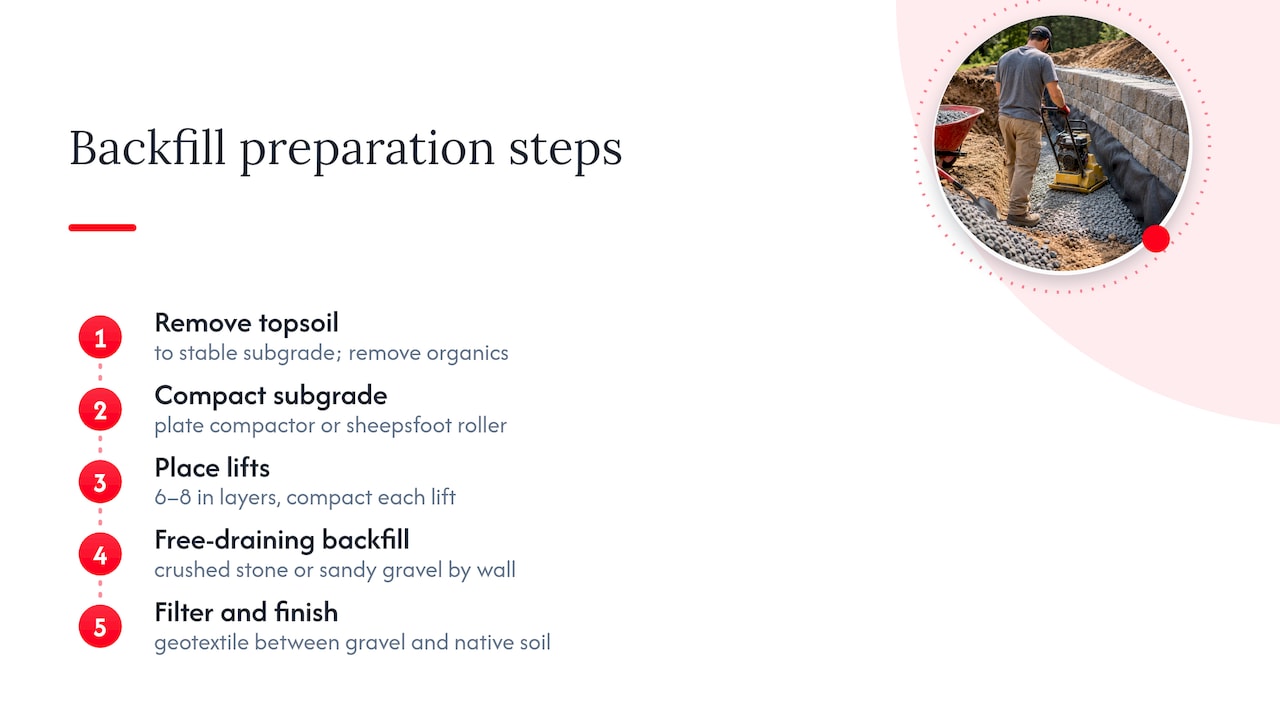
Keep the backfill zone wide enough to do its job: a narrow sliver of gravel pressed against the wall face with native clay right behind it does little good, since water still finds the clay and builds pressure there instead. A geotextile filter fabric between the free-draining backfill and native soil keeps fines from migrating into the gravel and clogging it over seasons of rain. Getting this right the first time costs less than digging a wall apart later to fix drainage problems rooted in poor backfill.
Keeping an eye on your terraces over time
A terraced wall is not a install-it-and-forget-it structure. Seasonal freeze-thaw cycles, heavy rain events, and simple settling all put small amounts of stress on the system every year.
Walk the full length of each tier a couple of times a year, looking for bulging or leaning sections, which usually signal drainage problems building pressure behind the wall rather than a one-time event. Check joints between blocks or timbers for widening gaps, and look at the soil at the base of each tier for signs of water pooling or erosion channels forming, both of which point to drainage that is not routing water where it should.
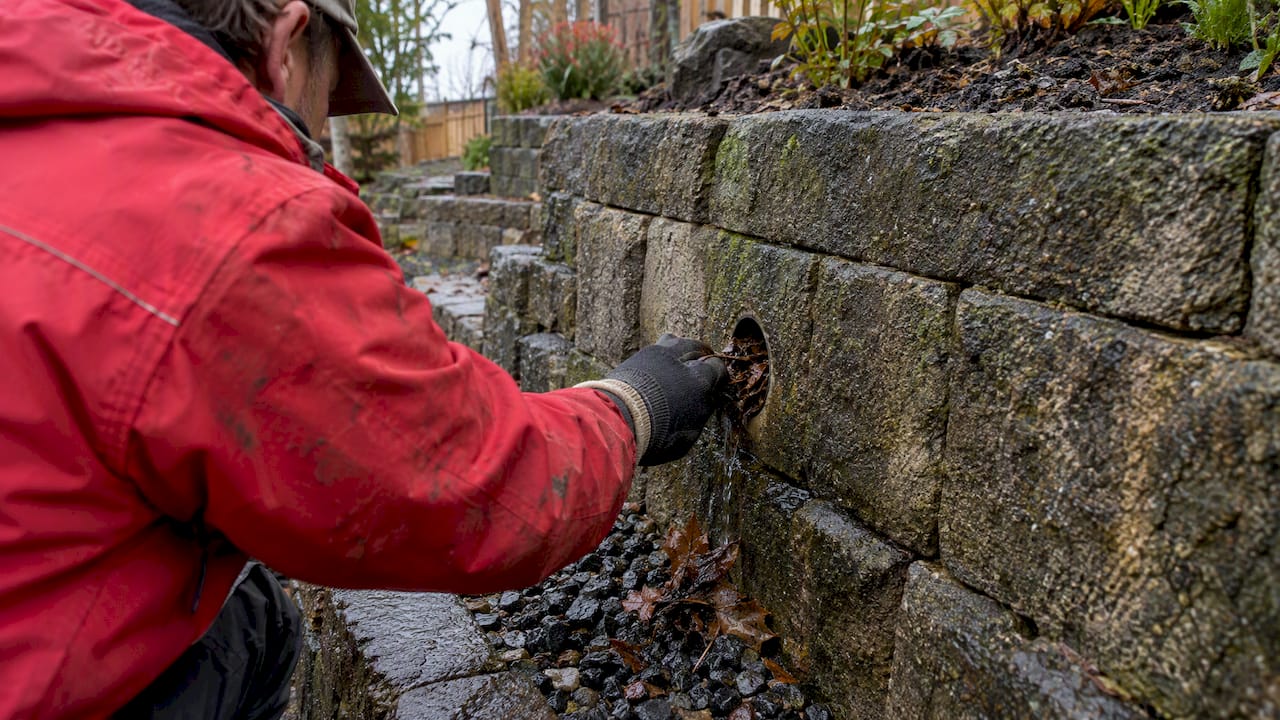
Clear any visible weep holes or drain outlets of debris, especially after fall leaf drop or a particularly wet season, since blocked outlets are often the first domino in a wall failure. Check that surface grading at the top of each tier still slopes water away rather than toward the wall, since soil settling over time can reverse that slope without anyone noticing until a wet season reveals it.
Small cracks in masonry mortar or minor timber warping are usually cosmetic and can wait for routine maintenance. Bulging faces, sudden leaning, or soil washing out from beneath a tier are signs that call for a prompt inspection rather than a wait-and-see approach, since those symptoms often mean the wall is already losing its fight against water pressure or soil load. Our overview of retaining wall failure signs goes deeper into what each warning sign usually means.
What terraced walls actually cost and why
Pricing a tiered wall depends on several factors that stack on top of each other rather than one single number. Total wall height and length set the baseline material quantity, but the number of tiers adds cost beyond that, since each tier needs its own footing, drainage system, and backfill, multiplying labor even when the combined height is no greater than a single tall wall.
Material choice shifts the budget significantly: timber generally costs less upfront than segmental block, while engineered MSE systems with geogrid reinforcement cost more because of the reinforcement material and the design work behind it. Site access and slope steepness affect cost too; a yard a machine can reach easily is cheaper to grade and excavate than a tight side yard requiring hand labor.
Drainage adds a cost line that is easy to underestimate: gravel, pipe, filter fabric, and any maintainable drain inserts all add material and labor beyond what the visible wall face suggests. Permit and engineering fees apply once a project crosses the height threshold that triggers review, adding design costs that a low, single-tier garden wall would never need.
Soil conditions can swing a budget more than homeowners expect. Rocky ground that needs breaking up, or soft soil that needs over-excavation and extra compaction, both add time and cost that are hard to estimate accurately without a site visit. Our detailed retaining wall cost guide breaks down how these factors typically combine in a project estimate.
Common construction mistakes that lead to failure
Most terraced wall failures trace back to a handful of repeated mistakes rather than exotic engineering problems.
Skipping or skimping on drainage is the most common one: a wall built without free-draining backfill, a perforated pipe, and a filter fabric is essentially waiting for a heavy rain to build up hydrostatic pressure it was never designed to resist. Compacting backfill in one thick lift instead of thin, repeated layers is a close second, since it leaves voids that let the wall settle unevenly months after the project looks finished.
Ignoring the bench width guideline between tiers is another frequent error. Building a narrow bench between two tiers effectively stacks the upper wall’s load onto the lower one in a way the lower wall was not designed to carry, which is exactly the scenario the Snohomish County bench width guidance exists to prevent.
Treating closely spaced tiers as fully independent walls when they are not is a mistake that shows up in the tiered wall design methodology research: tiers spaced too close together can fail global stability checks even when each individual tier looks fine on paper. For planting benches between tiers, refreshing the soil and plant selection periodically also keeps roots from undermining joints over time, a point covered in Ivan’s Landscaping’s guidance on refreshing landscape beds.
Finally, skipping permits on a project that technically needs one is a mistake that surfaces later, often at the worst possible time such as a home sale, when an uninspected structure becomes a negotiating problem rather than a landscape feature.
What 20 years of building walls teaches you about failure
Clogged drains, undocumented backfill, and skipped permits cause most of the terraced wall problems we get called to fix. A contractor who will not describe drainage specifics, compaction method, or engineered details in writing is one to question before signing anything.
Worth asking at the estimate stage: what drainage components are included, how backfill gets compacted, whether engineered plans are needed, and what the warranty covers. References and photos of completed tiered projects tell you more than a sales pitch ever will.
— Abraham
Get a free quote for your terraced wall project
We build retaining walls, handle the concrete and masonry work tiers often need at each footing, and finish the job with landscaping once the terraces are in. Licensed and insured builders with over 20 years of experience mean the drainage and compaction details covered above are handled correctly the first time, not discovered as problems later.

A free on-site quote includes a walk of your slope, a straightforward discussion of whether your project crosses a permit threshold, and a rough timeline before you commit to anything.
- Retaining wall design and construction, including multi-tier terrace systems.
- Concrete pouring and masonry for footings, caps, and tier transitions.
- Landscaping and hardscaping to finish benches once the walls are built.
Request your free quote through our services page and get a clear answer on what your slope actually needs.
FAQ
What is a terraced retaining wall?
A terraced retaining wall, also called a tiered wall, breaks one steep slope into a series of smaller walls stacked with flat benches between them. This creates usable space for planting or seating while reducing the erosion that a single tall slope would otherwise suffer, according to Snohomish County’s terracing guidance.
What is the cheapest option for a retaining wall?
Timber generally has the lowest upfront material cost among common retaining wall materials, making it a popular choice for low, short-term terraces. It trades that lower cost for a shorter service life, since rot and insect damage tend to shorten timber walls compared with masonry or block alternatives.
What is the 1/3 rule for retaining walls?
There is no single universal “1/3 rule” with one fixed definition, but the idea generally refers to keeping a lower tier’s height in reasonable proportion to the tier above it so the upper wall’s load does not effectively sit on top of the lower structure. The more precise version of this concept is the offset distance rule from tiered wall design methodology, which ties the required gap between tiers to wall height and soil friction angle.
How do I build a terraced retaining wall?
Building a terraced wall generally follows clearing and grading the slope, leveling a footing for the lowest tier, installing drainage before backfilling, then building and backfilling each tier in sequence up the slope. Bench width between tiers should generally equal the height of the lower wall, and any project nearing a 4-foot total height typically needs a permit and engineered plans under guidance like Snohomish County’s rules.
Sources
- Retaining Walls & Terracing | Snohomish County, WA
- Design Methodology for Tiered MSE or Concrete Block Retaining Walls (CTR/TxDOT)
- Design of Maintainable Drains for Earth Retaining Structures (CTRE / Iowa State)
- Retaining wall plan review checklist — Los Angeles County Building and Safety