Inspect your deck from the bottom up, every year, before you host a single cookout. Start with the ledger board, the posts, and the joists, then move up to the surface and railings. If you find a ledger pulling away from the house, major sagging, or wood that crumbles under a screwdriver, stop using the deck immediately and call a licensed contractor.
TL;DR:
- Most deck failures start with small issues like ledger gaps, rusted fasteners, or minor rot that worsen over time if left unaddressed.
- The most critical structural components to check are the footings, posts, and ledger board, especially for ground contact, cracking, tilting, or separation from the house.
- Inspect joists and their connections for water damage, rot, and proper use of metal hangers, avoiding reliance on toe-nailed joints common in older decks.
- Surface damage, such as cracked or loose boards, indicates underlying problems and warrants close examination of fasteners and potential moisture trapping.
- Engaging a professional inspector is essential for hidden issues like ledger separation or settlement, particularly before adding heavy loads or if signs of instability appear.
Table of Contents
- Deck Safety Inspection Tools and How to Prep Safely
- How Do You Check Footings, Posts, Joists, and the Ledger?
- Checking the Deck Surface: Boards, Composite, and Fasteners
- Are Your Railings and Stairs Actually Stable?
- What Do Rot, Insects, and Corrosion Actually Look Like?
- When Should You Hire a Professional Inspector?
- How Do You Do the Pick Test the Right Way?
- Your Deck Inspection Checklist for This Year
- What Our Crews See Most Often on Deck Inspections
- Get a Straight Answer on Your Deck’s Condition
- Where to Verify This Guidance Yourself
- Sources
- FAQ
Deck Safety Inspection Tools and How to Prep Safely
You don’t need a contractor’s truck to check your own deck. A moisture meter is optional but useful if you suspect hidden rot behind siding or under boards that look fine on top.
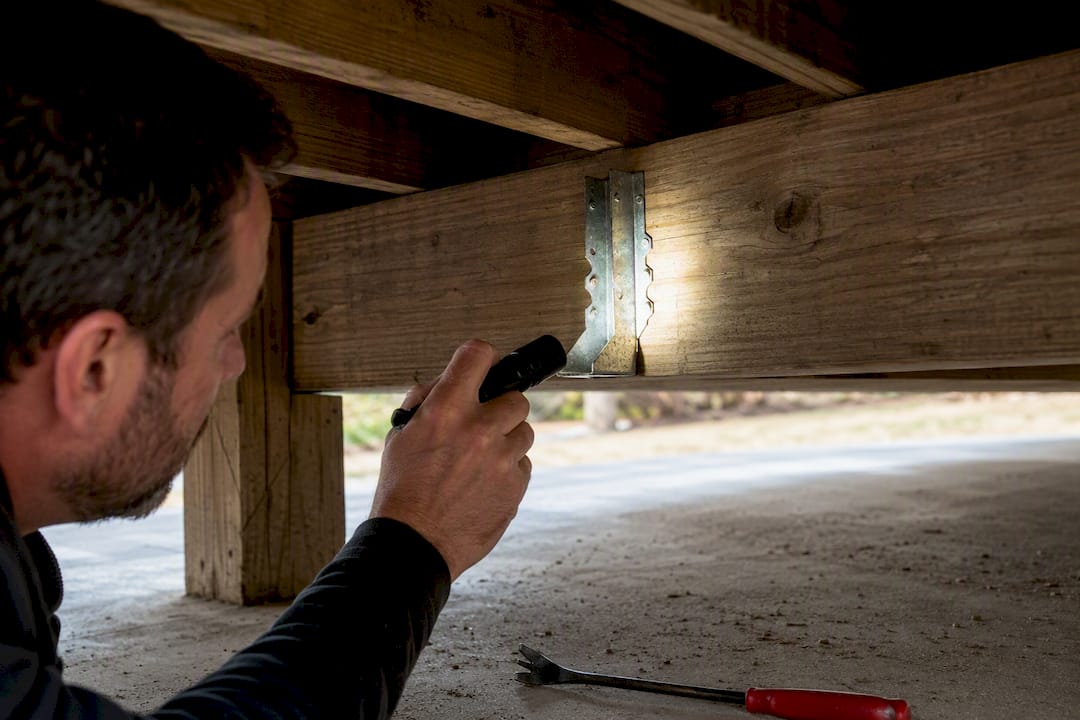
Before you touch a single board, go underneath the deck first. That’s not a suggestion, it’s the order InterNACHI recommends, because inspecting from below first lets you spot a compromised joist or a cracked post before you put your weight on the surface above it. Bring a helper if you’re moving a ladder around uneven ground, and brace the ladder on solid, level footing, not on a slope or loose mulch.
Pro Tip: Take photos of every suspicious spot as you go, wide shot and close-up. If you end up calling a contractor for a quote, labeled photos save an extra site visit and speed up the estimate.
- Flashlight and phone camera for underside inspection and documentation
- Flathead screwdriver or metal pick for probing suspect wood
- Level and tape measure for checking sag and spacing
- Moisture meter (optional) for hidden rot near grade or flashing
- Sturdy ladder with a second person spotting
How Do You Check Footings, Posts, Joists, and the Ledger?
This is the part of a deck safety inspection that actually determines whether the structure is safe, because everything above it rests on these connections. Surface problems are annoying. Substructure problems are dangerous.
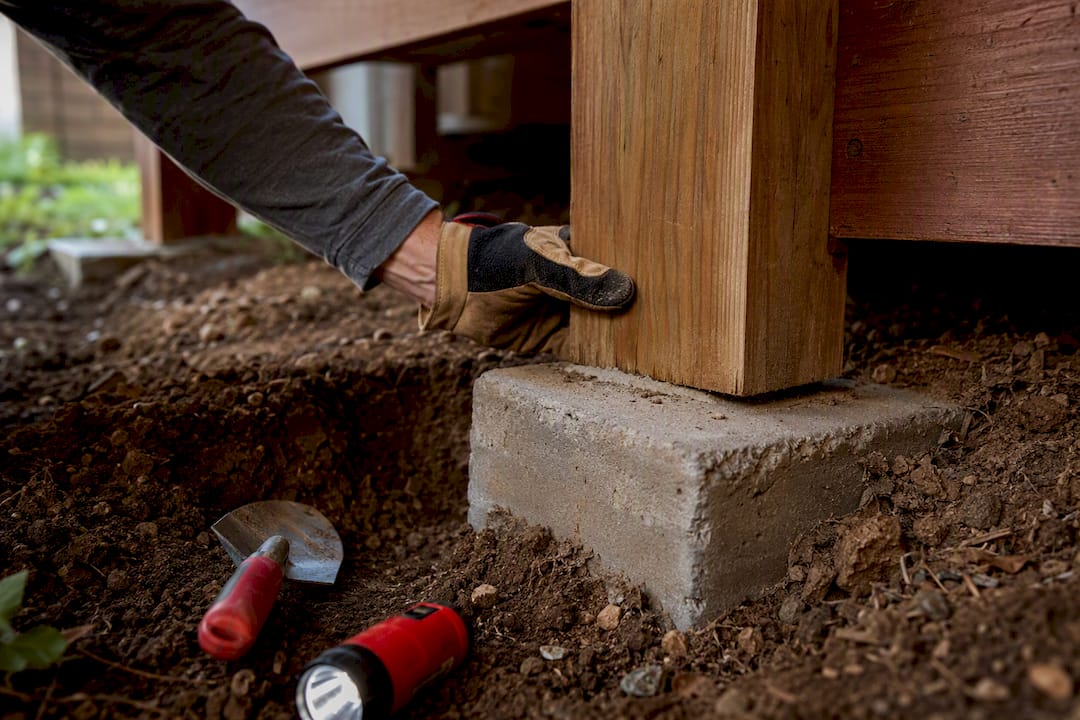
1. Footings and posts. Walk the perimeter underneath and look at where each post meets its footing. You want a clean, visible gap between wood and soil, not direct ground contact, which invites rot and termites. Check for cracking or tilting in concrete footings, and press against each post to feel for movement. A post that rocks even slightly at its base means the footing has shifted or the connection hardware has failed.
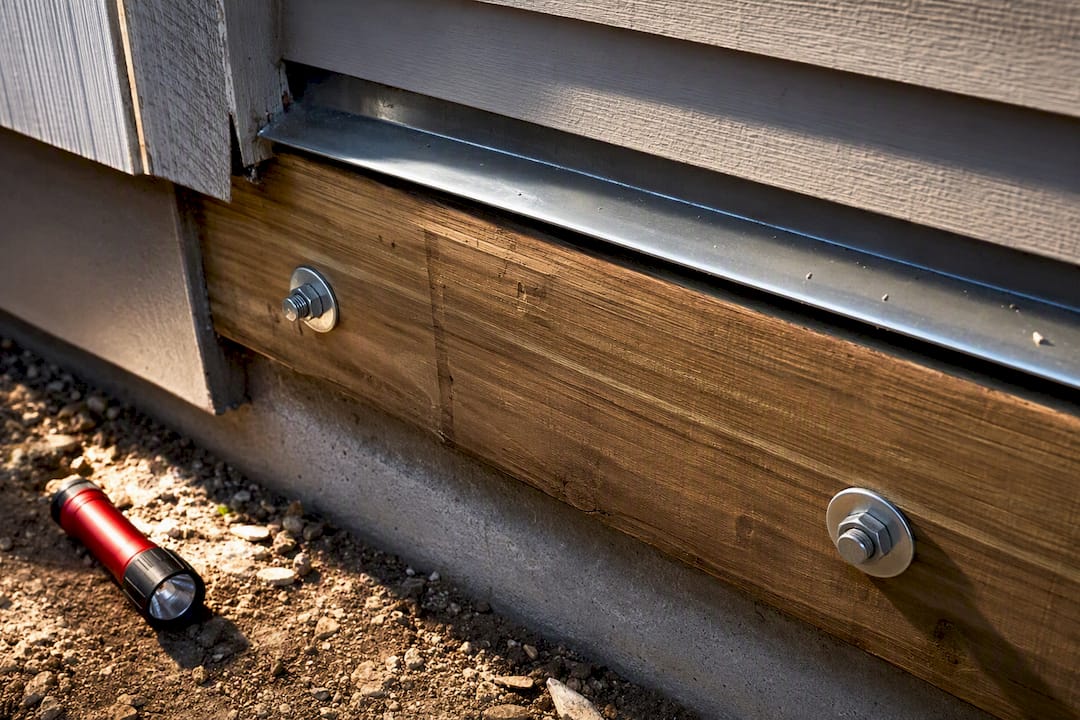
2. The ledger board. This is the single most important connection on the entire deck. The ledger is the board bolted to your house that the rest of the frame hangs from, and improper fastening or missing flashing is a leading cause of catastrophic collapse. Look for a metal flashing strip tucked behind the siding and over the ledger, directing water away from the house rather than into it. This Old House is explicit on this point: nails alone on a ledger board are a red flag, full stop. Look for any horizontal gap between the ledger and the house wall. Even a hairline gap can mean the deck has started separating from the structure, and that’s not a wait-and-see situation.
3. Joists and girders. Run your flashlight down the length of each joist looking for water stains, soft spots, or visible rot near the ends where they meet the ledger or beam. Check how joists connect to the beam and ledger. Modern construction uses metal joist hangers, and their absence matters. Many older decks were built relying on toe-nailing, where nails are driven diagonally through the joist into the ledger or beam instead of using a hanger. Toe-nailed connections fail under repeated load cycles far more often than hangers do, and inspectors treat a nail-only joist connection as a warning sign worth flagging for correction. Also scan for spans that look unusually long between supports, since oversized spans without adequate blocking can lead to bounce or sag over time.
If you notice soil erosion, heaving, or cracking in the ground near your footings, that’s often a sign of a bigger drainage or grading issue rather than a deck problem alone. It’s worth a look at what’s happening underground before you assume the deck itself is at fault.
Checking the Deck Surface: Boards, Composite, and Fasteners
Surface damage rarely causes a collapse on its own, but it’s often the first visible clue that something underneath needs attention, and it’s also where most splinters and twisted ankles happen.
Walk the entire deck slowly and look down, not just ahead. Press on boards near the edges and around any drainage gaps. Wood decking that’s cracked, cupped, or visibly gray and fuzzy has likely lost structural integrity in that spot. Composite decking behaves differently: it doesn’t splinter the way wood does, but it can crack at fastener points, fade unevenly, or develop a spongy feel if moisture got trapped beneath the board during installation.
- Look for splinters, checking for surface cracks, or bowing along the board length
- Press near board edges to check for spring-back or soft, mushy give
- Check screw and nail heads for pull-out, rust streaks, or heads sitting above the surface
- Inspect composite boards for cracking around fasteners rather than splintering
- Note any boards that flex noticeably more than their neighbors
Fastener corrosion deserves its own look, because a rusted screw head can look fine while the shank underneath has lost most of its holding strength. If your deck was built with standard galvanized screws and it’s more than a decade old, or if you’re near saltwater, budget for replacing corroded fasteners with stainless steel or coated hardware rated for ground contact. A pressure washing before you inspect can actually help here, since it clears grime and makes cracks and fastener corrosion easier to spot.
Are Your Railings and Stairs Actually Stable?
Railings fail more often than people expect, and InterNACHI’s guidance is blunt about it: rail failures happen more frequently than full deck collapses, which makes this one of the highest-value five-minute checks you can do.
Grab the top rail with both hands and push hard, side to side and then forward and back. Any wobble, especially at the posts where the rail meets the deck frame, means the connection has loosened or the post itself is compromised. Check picket spacing while you’re at it. Most codes call for gaps no wider than 4 inches to keep a small child from slipping through, though your local code may vary, so confirm with your municipality if you’re unsure. Standard guardrail height typically lands around 36 to 42 inches depending on deck height and local code.
- Grasp and shake every rail section, not just the ones near stairs
- Check picket gaps for consistent spacing, roughly 4 inches or less
- Look at stair stringers for cracking, rot, or separation from the frame
- Confirm stair risers are uniform height. Uneven risers are a trip hazard even on a brand-new deck
- Make sure the stair handrail is graspable, not just decorative
Pro Tip: If your stairs or railings don’t match current spacing and height codes, that’s not automatically an emergency, but it’s worth checking against your local requirements, especially before selling the home or hosting a large gathering. Our guide on deck stairs code requirements breaks down what inspectors typically look for.
What Do Rot, Insects, and Corrosion Actually Look Like?
Rot rarely announces itself. It hides under paint, behind flashing, and inside joists that look solid from three feet away. The giveaway is texture, not color: sound wood resists a screwdriver point, while rotted wood gives way with little pressure and breaks apart without splintering.
Insect damage tells a different story. Termite tunnels look like thin mud tubes running along foundation walls or posts, while carpenter ant damage often shows as smooth, clean galleries inside the wood rather than the crumbly texture of rot. Either one usually means you need pest control and a structural repair, not just one or the other.
- Rotted wood crumbles or breaks without splintering when probed
- Mud tubes on posts or footings usually indicate termite activity
- Smooth internal tunnels with no debris often point to carpenter ants
- Rust streaks around fasteners suggest corrosion has already weakened the connector
- Visible sag in the deck frame, even slight, means something underneath has already given way
Corrosion accelerates fast near saltwater or in humid climates, and it doesn’t just make hardware look bad. A corroded joist hanger or bolt loses grip strength gradually, so the connection can fail without any obvious warning until it’s under real load. If you’re seeing rust on more than a couple of fasteners, treat it as a signal to check the rest of the hardware, not an isolated cosmetic issue.
When Should You Hire a Professional Inspector?
Some things are genuinely fine to check yourself every year. Others need a trained eye and the right tools, and pretending otherwise is how people end up on the wrong side of a statistic.
Deck collapses and flooring failures caused roughly 8,700 injuries and two fatalities between 2020 and 2024, and a large share of those incidents trace back to exactly the substructure issues covered above: bad ledger connections, hidden rot, and corroded hardware nobody caught in time.
Deck collapses and flooring failures caused about 8,700 injuries and two fatalities over a five-year span, most tied to structural failures homeowners could have caught with a careful annual inspection.
Call a professional if you’re dealing with a hot tub, a hidden or inaccessible ledger connection, visible settlement, or any sagging that wasn’t there last year. A licensed inspector will document findings in a written report identifying unsafe components, recommend corrections, and refer you to a structural engineer if the load situation is unusual, like a heavy hot tub or an oversized addition. If you’re planning a heavier load setup, our guide to deck size and load planning is worth reading before you buy anything.
- Hire a pro for hidden ledger attachment issues you can’t fully see or access
- Hire a pro when you notice new sagging, settlement, or soil movement near footings
- Hire a pro before adding a hot tub or other concentrated heavy load
- Budget roughly $100 to $300 for a standard professional inspection, more for engineering evaluations
- Schedule a professional inspection every few years, sooner for decks over 15 years old or in coastal climates
How Do You Do the Pick Test the Right Way?
The pick test, sometimes called the probe test, is the single most reliable DIY method for telling sound wood from rotted wood, and it takes about ten seconds per spot once you know what you’re looking for.
- Start underneath the deck and work upward. Check footings and posts first, then joists and the ledger, before you ever step onto the deck surface.
- Pick a control spot on wood you know is solid, like a rarely-exposed joist, and press the screwdriver tip in to feel normal resistance.
- Move to suspect areas, especially near the ledger, post bases, and any spot showing discoloration, and press with the same pressure.
- Watch penetration depth. Penetration beyond roughly 1/4 inch, or wood that breaks apart without splintering, indicates advanced decay that likely needs structural replacement, not patching.
- Mark and photograph every failed spot immediately, and stop using that section of the deck until it’s evaluated further.
Pro Tip: Test at least three or four spots per major structural member, not just one. Rot often starts at a moisture trap, like a joist end tucked against the ledger, and can be isolated to just a few inches even when the rest of the board is sound.
Your Deck Inspection Checklist for This Year
Print this list, walk your deck with it, and hand your photos to any contractor you call for a quote. It mirrors the structure behind NADRA’s 10-point consumer checklist, one of the most widely used self-inspection standards in the industry.
- Photograph the ledger board, its flashing, and its fasteners from multiple angles
- Photograph each post base and footing, noting any soil contact or cracking
- Photograph joist ends near the ledger and beam, flagging any discoloration
- Photograph railings and stair stringers, noting any looseness found during testing
- Note any spot where the pick test showed penetration past 1/4 inch
- Flag anything on your stop list immediately: ledger separation, post movement, or sagging means no one uses the deck until it’s checked
Label each photo with location and date before sending it to a contractor. It turns a vague phone call into a fast, accurate quote.
What Our Crews See Most Often on Deck Inspections
Most of the failures we get called about didn’t happen overnight. They started as a small ledger gap or one rusted fastener that nobody caught during an annual check, and a few seasons later it’s a structural repair instead of a five-minute fix.
The pattern holds across almost every job: decks built with nailed ledgers or toe-nailed joists tend to show trouble first, usually right around the 10 to 15 year mark. If you’re planning any structural repair beyond swapping a few boards, check with your city first. Our breakdown of deck permit requirements explains when a fix needs a permit and when it doesn’t. We have spent over 20 years building and repairing decks with licensed, insured crews, and can usually scope a repair from your own photos before ever scheduling a site visit.
— Abraham
Get a Straight Answer on Your Deck’s Condition
If your pick test came back soft, your ledger has a gap, or you just want a second set of eyes before summer guests show up, We offer free quotes with no pressure to sign anything on the spot. Our crews carry deck-specific experience and know which substructure issues turn into safety hazards versus which ones are cosmetic.

Send us the labeled photos from your inspection checklist and we can often give you a realistic scope of work before a site visit is even scheduled. If the damage looks isolated to a section of decking or railing, a phone consultation with photos is usually enough to get you a preliminary estimate. If you’re seeing signs of ledger separation, post movement, or sagging, request an in-person visit right away rather than waiting. Our team handles everything from targeted repairs to full deck rebuilds, and you can browse our full range of outdoor construction services or request your free quote to get started.
Where to Verify This Guidance Yourself
For homeowners who want the primary sources behind these checks, the NADRA 10-point checklist is a free, downloadable self-inspection standard. InterNACHI’s illustrated deck inspection guide covers the bottom-up methodology in more visual detail, and if you’re dealing with a retaining wall near your deck footings, this rundown of retaining wall failure signs is a useful companion check.
Sources
- Guide to Deck Maintenance and Safety – Consumer Reports
- Inspecting a Deck, Illustrated – InterNACHI
- Deck inspection standard (Home Inspector SOP)
- Deck safety checklist – This Old House
FAQ
How Often Should I Inspect My Deck?
Do a full DIY visual and probe check once a year, ideally in early spring before heavy use starts. Schedule a professional inspection every few years, or sooner if your deck is older than 15 years or sits in a coastal, high-moisture climate.
What’s the First Sign My Ledger Board Is Failing?
Look for a visible gap between the ledger and the house wall, or fasteners that are simple nails instead of lag screws or through-bolts. Either sign means the deck should not be used until a professional confirms the connection is safe.
How Much Does a Professional Deck Inspection Cost?
Most professional inspections run roughly $100 to $300 depending on deck size and complexity, with engineering evaluations costing more for unusual loads or major structural concerns.
Can I Inspect a Composite Deck the Same Way as Wood?
Mostly yes, but composite decking cracks near fasteners instead of splintering, and it can hide moisture damage underneath without showing surface rot. Check fastener points closely and probe any spot that feels spongy or uneven.
What Should I Do Immediately If I Find Major Sagging?
Stop using that section of the deck right away and avoid placing any weight, furniture, or people on it. Call a licensed contractor or inspector promptly, since sagging usually signals a failed connection or compromised structural member underneath.