
Most leaning fence posts are repairable, and the fastest reliable fix for a sound post is to brace it, plumb it, and reset it with compacted gravel or fast-setting concrete. A repair spike works too, if the post is solid and set in soil rather than concrete. Replacement only becomes necessary when the post is rotten at the base, cracked, or when several posts have failed at once.
TL;DR:
- Repair spikes or brackets are quick, low-cost solutions suitable for solid posts set in soil, but they do not address hidden rot below grade.
- Concrete collars or fast-setting concrete are more durable options, especially for cracked footings or frost-heaved posts, with water runoff slope being a crucial finishing detail.
- Full replacement becomes necessary when a post fails a screwdriver test or shows significant rot or splitting, requiring removal of the old footing and proper deep planting of a new pressure-treated post.
- Adequate site preparation includes proper drainage, soil testing, and seasonal timing, with spring or summer ideal for curing concrete and avoiding freeze-thaw damage.
- Professional help is recommended when multiple posts fail simultaneously or when utilities are nearby, with detailed itemized quotes ensuring transparent costs for diagnosis, materials, and labor.
Table of Contents
- Quick diagnosis: determine the cause before you pick a fix
- Tools and materials to prepare before you start
- Step-by-step workflow that works for any reset or replacement
- Method A: repair spike or ground bracket (least invasive)
- Method B: concrete collar or fast-setting concrete reset (durable fix)
- Method C: full post replacement (durable long-term solution)
- When to hire a pro and what a fair quote includes
- Prevention: drainage, sealing, and seasonal checks that prevent re-leaning
- Temporary bracing and safety before work
- Impact of different soil types on fence stability and repair approaches
- Seasonal considerations for fence repair (best times of year)
- How to identify signs that a fence may lean soon (early warning signs)
- Author perspective from Action Fence and Deck
- Repair, replacement, or a free quote from us
- Sources
- FAQ
Quick diagnosis: determine the cause before you pick a fix
A lean usually traces back to one of four causes: rot at the base, frost or soil heave pushing the footing, impact from a mower or storm debris, or a footing that was too shallow from the start. Bob Vila’s diagnostic guidance notes that a visible lean tells you almost nothing on its own. You have to dig in and check before deciding how to fix it.
Run these checks before you touch a tool:
- Push a screwdriver into the wood at grade level and just below it to feel for softness.
- Look at the concrete footing for cracks, crumbling edges, or a clean break at the surface.
- Measure the lean in inches over the post’s height to track whether it is getting worse over time.
If the screwdriver sinks in with light pressure or the wood splits along the grain, plan on replacing that post. A post that fails this test cannot be trusted even if the surface looks fine.
Tools and materials to prepare before you start
Gathering everything up front keeps you from making multiple trips to the hardware store mid-repair. For most jobs, you need:
- A shovel or post hole digger, plus a pry bar for stubborn footings.
- A 4-foot level, two spare 2x4s for bracing, a tamper, and a drill.
- Work gloves, safety glasses, and a sledgehammer if you’re breaking up old concrete.
Materials depend on the method. Angi’s repair guide lists repair spikes at roughly $25 to $80, fast-setting concrete bags at about $10 to $30 each, and steel angle brackets for temporary bracing around $30 to $50. Budget for two or three bags of concrete per post if you’re doing a full reset, since undersizing the pour is a common mistake.
Step-by-step workflow that works for any reset or replacement
Whether you’re resetting a post or replacing it outright, the sequence stays the same. This keeps the fence supported the whole time and makes sure you end up plumb before anything sets.
- Photograph the lean and the surrounding panels, then brace the fence with 2x4s driven into the ground at an angle.
- Remove nearby pickets or rail sections if they’re blocking access to the post base.
- Excavate around the post, probing for rot as you go, and clear away any loose or cracked concrete.
- Plumb the post in two directions using your level, then lock it in place with temporary braces.
- Choose your repair method and fill the hole, sloping the top surface away from the post so water runs off.
- Let the fill cure according to the product instructions before removing braces or reattaching panels.
- Recheck plumb one more time after the panels go back on.
This sequence matches the step-by-step approach outlined by FixUpFirst, which stresses documenting the lean and checking both sides of the post before you commit to a method.
Pro Tip: Leave the temporary braces in place for at least 24 hours after filling, even if the product claims a faster set time. A slight bump before full cure can undo the whole job.
Method A: repair spike or ground bracket (least invasive)
A repair spike or bracket, sometimes sold as an E-Z Mender or Post Buddy, is the quickest option when the post itself is solid and set directly in soil. WikiHow’s guide on straightening fence posts notes that these brackets only work for specific post and footing combinations, so check the product directions before buying.
The process is straightforward:
- Brace the fence, then drive the spike into the ground next to the post.
- Check plumb, then lag-bolt the bracket to the post through its pre-drilled holes.
- Leave the temporary braces up until the soil around the spike settles.
The upside is speed and low cost, often under $80 in materials. The downside is that a spike does nothing for hidden rot below grade, so it’s a poor match for a post that already failed a probe test.
Method B: concrete collar or fast-setting concrete reset (durable fix)
Concrete is the right call when the post itself is sound but the footing has cracked, or frost heave has pushed it loose. It costs more in time than a spike but holds up better against repeat movement.
The steps:
- Excavate down past the broken concrete and remove all loose debris.
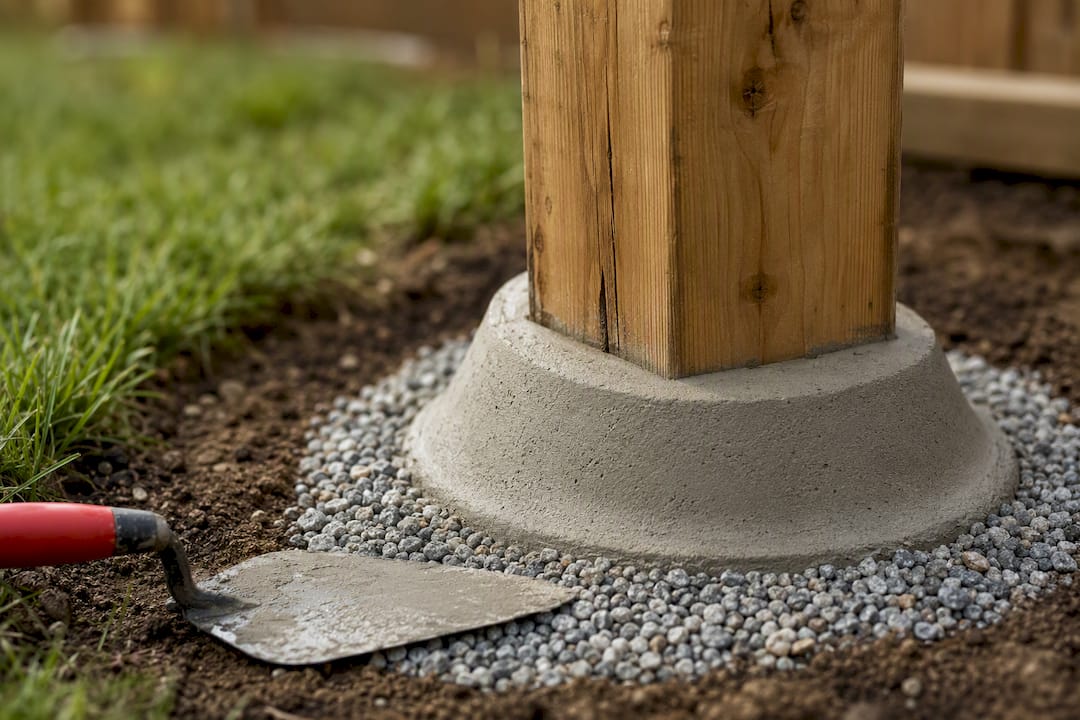
- Add a few inches of gravel at the bottom for drainage.
- Plumb the post in both directions and hold it with braces.
- Pour fast-setting concrete around the base, then finish the top sloped away from the post.
Fast-setting concrete typically allows panel reattachment in 4 to 6 hours, though full structural cure depends on the product and weather. That distinction matters when you’re planning a weekend project around it.
The sloped top is the detail most homeowners skip, and it’s the one that determines whether the repair lasts. Water pooling against a post is what caused half the rot problems in the first place. Recent DIY write-ups treat this slope as the single most important finishing step in the whole job. Expect to spend $10 to $30 per bag, with most single-post resets needing two to three bags.
Method C: full post replacement (durable long-term solution)
Replacement is the only real fix once a post has failed the screwdriver test, split along its length, or when two or more posts in the same run are showing the same problem. Bracing and brackets cannot restore wood that has already rotted away below grade.
The replacement sequence:
- Support the adjacent panels so removing the post doesn’t drop the whole section.
- Break out and remove the old footing, then dig a new hole to proper depth for your region’s frost line.
- Add a gravel base, set a new pressure-treated post, plumb it, and pour concrete around it.
Local frost depth determines how deep the hole needs to be, so check with your municipality if you’re unsure. A single-post replacement, including materials and a half day of labor, generally lands in the low hundreds of dollars for DIYers, more if a contractor handles it.
When to hire a pro and what a fair quote includes
Some jobs are worth handing off. Call a contractor when multiple posts have failed together, when a gate or retaining wall is tied into the fence line, when you suspect a buried utility line near the dig site, or when you simply can’t tell how deep the damage goes. A leaning retaining wall involves different failure patterns than a fence post, and mixing up the two can lead to the wrong fix entirely.
A trustworthy quote breaks down each cost separately rather than bundling everything into one number. Look for:
- Diagnosis and inspection listed as its own line item.
- Removal, new posts, footings, and materials itemized individually.
- Labor, disposal, timeline, and warranty terms spelled out.
Angi’s cost data notes that pro repair costs vary widely depending on scope, which is exactly why itemization matters. Our own fence repair cost guide walks through what a fair estimate should include line by line.
Prevention: drainage, sealing, and seasonal checks that prevent re-leaning
A repair that ignores drainage will likely fail again within a few seasons. A few habits extend the life of any fix:
- Slope the concrete top away from the post and add a gravel layer underneath before pouring.
- Use post caps and ground-contact-rated lumber on any new or replaced post.
- Keep mulch and soil pulled back from the base instead of piled against it.
Check posts each spring and fall for early softness or fresh cracks in the footing, catching small problems before they become full leans. Our spring inspection checklist covers the exact points to check after winter.
Pro Tip: Ground-contact-rated lumber costs a little more up front, but it resists the rot that causes most leaning posts in the first place.
Temporary bracing and safety before work
Skipping the bracing step is the most common way a simple repair turns into an injury or a bigger job. Once you start digging around a post base or breaking up its footing, the fence panels on either side lose their main support. A section of fence, especially anything heavier than a basic picket style, can shift or fall while you’re crouched next to it.
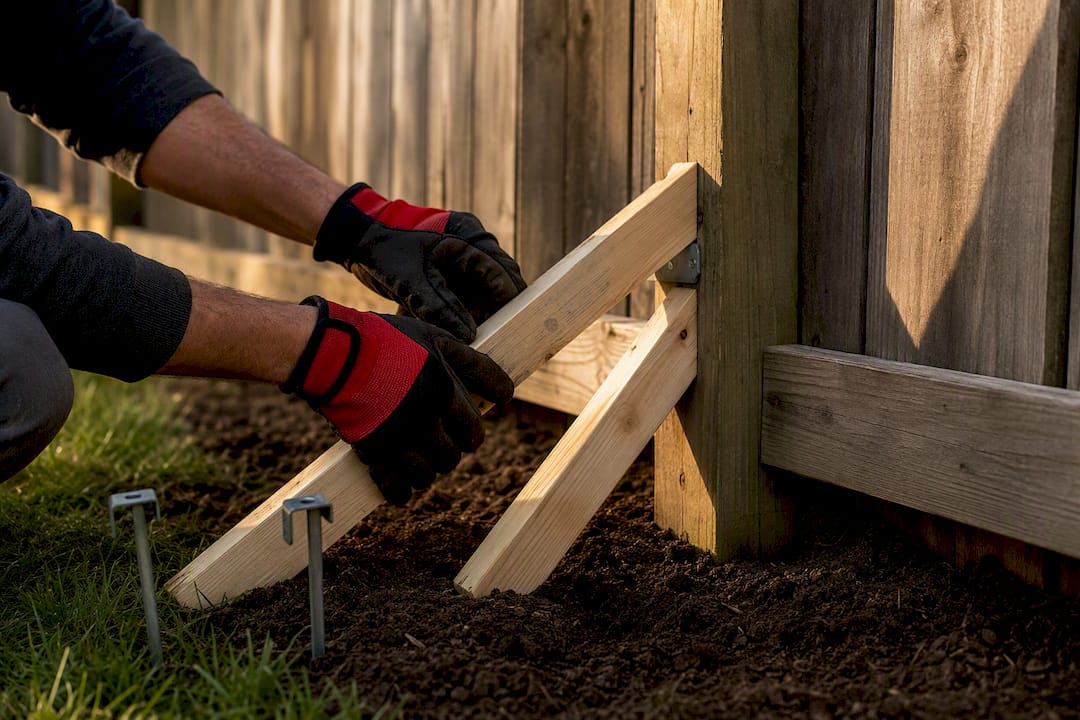
Bob Vila’s guide treats bracing as mandatory, not optional, for exactly this reason. Set your 2×4 braces at an angle against the post and stake them into the ground on both sides, front and back, so the post can’t rock in either direction while you work. Check that the braces hold plumb before you start excavating, not after.
Keep a few other basics in mind while you work. Call your local utility locator service before digging near a fence line, since buried cables and lines sometimes run closer to property boundaries than people expect. Wear gloves and eye protection when breaking up old concrete, since chips fly unpredictably under a sledgehammer. Keep kids and pets away from the work area until the post is fully set and the braces come down. None of this adds much time to the job, and it’s the difference between a clean repair and a trip to urgent care.
Impact of different soil types on fence stability and repair approaches
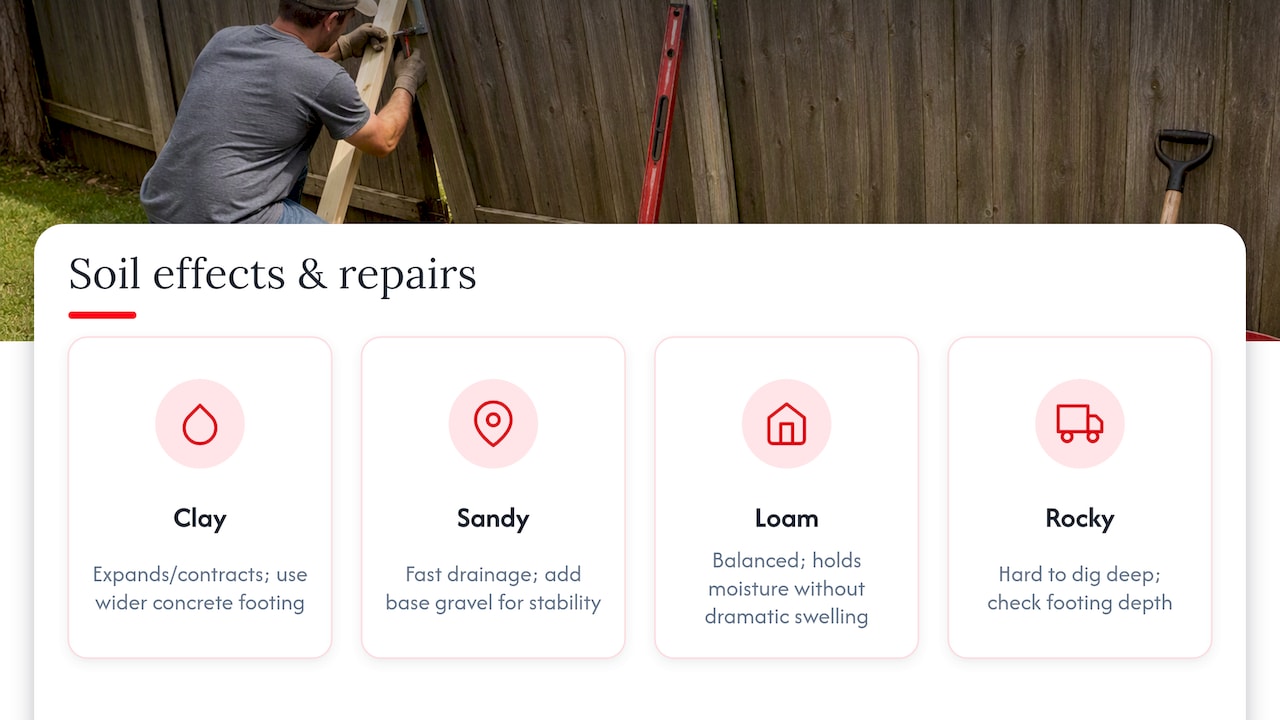
The soil under your fence has as much to do with a lean as the post itself. Clay-heavy soil expands when wet and contracts when dry, which slowly rocks a post loose over repeated cycles even if the wood is in good shape. Sandy soil drains fast but offers less resistance to lateral force, so posts set in sand tend to lean under wind load or a hard bump sooner than posts in denser soil.
Loam, the balanced mix most gardeners prize, is generally the most forgiving base for a fence post because it holds moisture without swelling and shrinking as dramatically as clay. Rocky soil creates a different problem: it’s hard to dig to full depth, which sometimes means the original footing was never as deep as it should have been.
Knowing your soil type changes how you repair, not just why the post failed. In clay, a wider concrete footing spreads the load and resists the swelling cycle better than a narrow one. In sandy soil, extra gravel at the base improves drainage and gives the concrete something stable to key into. If you’re replacing a post in an area with heavy clay or a high water table, consider whether the footing depth was adequate in the first place, since undersized footings are a common cause of repeat failures in these conditions.
Seasonal considerations for fence repair (best times of year)
Temperature and ground conditions affect both the repair itself and how long it lasts. Late spring through early fall is generally the easiest window for fence work. The ground is workable, concrete cures at a predictable rate, and you’re not fighting frozen soil or a muddy excavation.
Winter repairs are harder for a practical reason: frozen ground resists digging, and concrete cures poorly in freezing temperatures unless you use a cold-weather mix and take extra precautions. If a post fails in winter, temporary bracing can hold it safely until conditions improve, rather than forcing a rushed fix in bad conditions.
Early spring is worth flagging for a different reason. Freeze-thaw cycles over winter are one of the most common causes of a newly leaning post, so this is the season when small problems tend to show up first. A quick inspection right after the thaw catches movement before it turns into a full lean, which is part of why our spring inspection checklist focuses on that window specifically. If you’re planning a full replacement rather than a quick repair, scheduling it for late spring or summer gives the concrete the best conditions to cure fully before the next freeze cycle arrives.
How to identify signs that a fence may lean soon (early warning signs)
A fence rarely goes from straight to leaning overnight. Watching for a few early signs lets you catch the problem while a quick reset is still an option, instead of waiting until replacement is the only choice.
Look for these signals during a routine walk around the property:
- A gap opening up between the post and the ground on one side, even a small one.
- Visible cracks radiating from the base of the concrete footing.
- Panels that rattle or shift more than they used to when pushed by hand.
- Soft or discolored wood near the base, especially where soil or mulch touches the post.
Catching any of these early means you’re likely dealing with a simple reset rather than a full replacement. A post that’s just starting to shift is a candidate for the spike or concrete collar methods described above. One that’s already splitting or soft at the base is telling you it’s past that point.
Author perspective from Action Fence and Deck
We generally favor replacement over patch fixes when a post has failed a rot test, because bracing a compromised post just delays the same repair. That said, a solid post with a cracked footing doesn’t need to come out. It needs a proper reset with drainage built in. The real trade-off homeowners face is cost against how long a fix will actually last, and a rushed repair on bad wood rarely saves money in the end.
— Abraham
Repair, replacement, or a free quote from us
If a leaning post turns out to be more than a weekend fix, or you’d rather not spend the afternoon under a fence line, professional contractors can handle inspection, repair, and full replacement as part of fencing solutions.

Multiple failing posts, a gate tied into the run, or a footing you can’t diagnose yourself are all good reasons to call in a pro instead of guessing. Request a free quote on our services page and we’ll tell you straight whether it’s a repair or a replacement.
Sources
- How to Fix a Leaning Fence
- How to Fix a Leaning Fence Post: A Step-by-Step DIY Guide
- How to Fix a Leaning Fence Post: Step-by-Step DIY Guide
FAQ
How much does it cost to repair a leaning fence?
Costs depend heavily on the method and whether you hire a pro or do it yourself. DIY material costs for a single post, using a repair spike or fast-setting concrete, generally run $25 to $80 for a spike or $10 to $30 per bag of concrete, while professional repairs are quoted individually based on scope and should itemize diagnosis, materials, and labor.
Who is responsible for a leaning fence?
Responsibility usually falls on the property owner whose land the fence sits on or who installed it, though shared boundary fences can involve both neighbors depending on local property rules. Check your property deed or local ordinances for specifics, since these vary by location.
How much does it cost to fix a leaning fence post?
A single post repair using a spike or bracket typically costs $25 to $80 in materials, while a concrete reset runs $10 to $30 per bag, with most posts needing two to three bags. Full replacement, including a new post and footing, generally costs more due to the added labor and materials.
How do you fix a leaning fence post without removing it?
If the post itself is sound, brace the fence, excavate around the base, plumb the post in two directions, and refill with compacted gravel or fast-setting concrete, or use a repair spike if the post sits in soil rather than concrete. This only works when the wood passes a screwdriver probe test and shows no rot or splitting at the base.