Inspect your fence once a year, clean it once a year, and reseal it on a fixed schedule based on the wood, and a wood fence will regularly outlast one that gets ignored. Left alone, most wood fences start failing at the posts within a decade. The fix isn’t complicated: catch rot at ground level early, keep water off the end grain, and stay ahead of the reseal clock.
TL;DR:
- Regular inspection at ground level is crucial to identify rot, insect damage, or shifting posts early before costly repairs are necessary.
- Cleaning with oxygen bleach and careful pressure washing extend the wood’s lifespan without damaging its fibers or grain.
- Sealing or staining should be done after a dry period of 3 to 6 months, with more frequent recoats needed for pressure-treated pine than for cedar or redwood.
- Fixing localized damage is usually straightforward; however, extensive rot or structural issues require professional evaluation and replacement.
- Preventative drainage measures and proper post protection significantly delay early post rot and reduce overall maintenance costs.
Table of Contents
- Wood Fence Maintenance Starts With a Real Inspection
- How Do You Clean a Wood Fence Without Damaging It?
- When Should You Seal or Stain a Wood Fence?
- Repairing Wood Fence Damage: What You Can Fix vs. What Needs Replacement
- Stopping Post Rot Before It Starts
- Your Wood Fence Maintenance Schedule at a Glance
- Who’s Behind This Guide
- Keeping Termites, Carpenter Ants, and Other Wood Pests Off Your Fence
- Handling Mold, Mildew, and Algae Buildup
- Staying Safe With Chemicals and Pressure Washers
- Which Wood Type Actually Holds Up Best?
- Sun, Humidity, and Climate: Why Location Changes Your Maintenance Timeline
- Why Post Protection Beats Everything Else on This List
- Need a Hand? Action Fence and Deck Handles the Repairs You’d Rather Not DIY
- Sources
- FAQ
Wood Fence Maintenance Starts With a Real Inspection
A brief walk along the fence line regularly can catch most issues that turn into expensive repairs. Start at the ground. Press against each post about a foot up. Any wobble or give means the post is likely rotting below grade, even if the wood above looks fine.
Check for these signs as you go:
- Soft, spongy wood at the base of posts, especially where they meet soil or concrete
- Small round exit holes, sawdust piles, or hollow-sounding wood when tapped, which point to insects
- Cracked or split end grain on top rails and post caps
- Rusted, loose, or missing screws, nails, and hinges
- A gate that scrapes the ground or won’t latch, a common early sign of a shifting post
If you find rot on multiple posts or a section leans noticeably, that’s your cue to bring in a professional for a full evaluation rather than patching piece by piece.
How Do You Clean a Wood Fence Without Damaging It?
Cleaning does two jobs: it removes mold and mildew that trap moisture against the wood, and it strips away grime so a new coat of stain actually bonds. Skip chlorine bleach. It brightens wood but breaks down lignin, the fiber that holds the wood together over time. Oxygen bleach mixed with warm water does the job without that damage.
Here’s the process:
- Mix oxygen bleach with warm water per the label, then load it into a garden pump sprayer.
- Saturate the fence in sections, working from the bottom up to avoid streaking.
- Let it sit 10 to 15 minutes, then scrub stubborn spots with a stiff nylon brush, never wire.
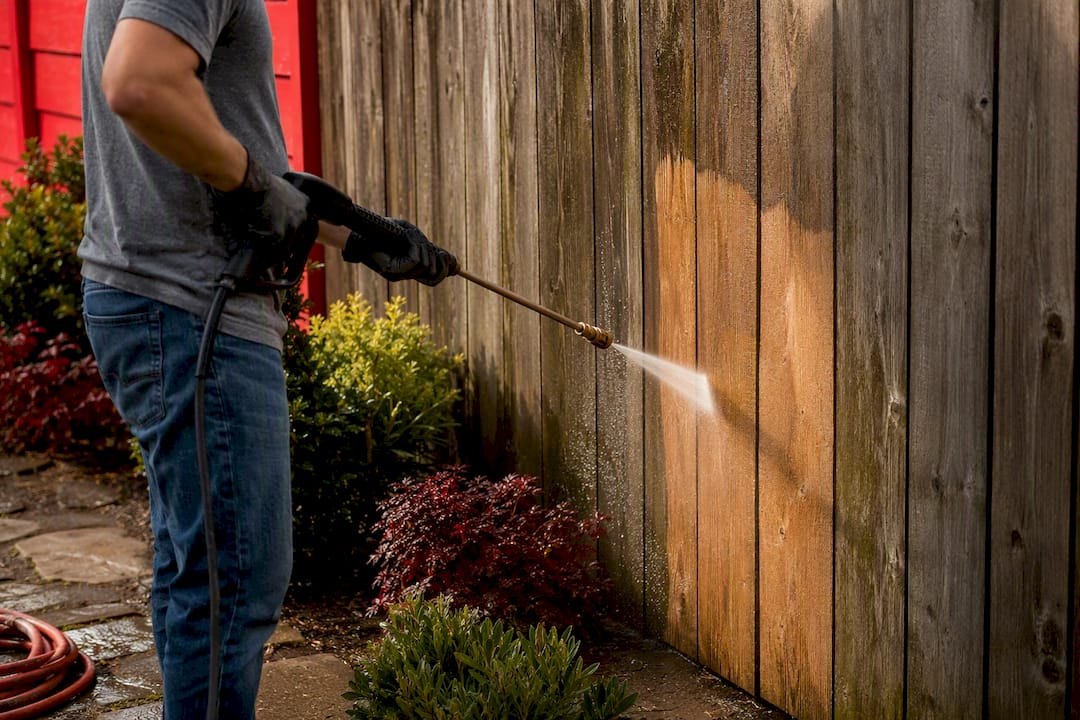
- Rinse thoroughly with a garden hose or a pressure washer on the lowest effective setting.
- Let the wood dry 24 to 48 hours before applying any stain or sealer.
If you use a pressure washer, keep it under 2,000 PSI with a 25-degree tip, holding the nozzle at least 12 inches from the surface and keeping it moving constantly. Hold it in one spot and you’ll gouge the wood and raise the grain, which actually speeds up weathering.
Pro Tip: If you’re not confident dialing in the PSI and distance yourself, hire it out. A botched pressure-washing job can do more damage than a decade of weather, and it’s one of the more common DIY mistakes we see when we’re called out for repairs.
When Should You Seal or Stain a Wood Fence?
New fence lumber needs time to release moisture before it can absorb a finish. Wait 3 to 6 months after installation, and use a simple water test: sprinkle a few drops on the wood, and if they soak in within 10 seconds, the wood is dry enough to stain.
Not every product does the same job:
- Clear waterproofer/sealer: blocks moisture, minimal color change, needs the most frequent reapplication
- Stain-and-sealer combo: adds pigment for UV protection plus water resistance in one step
- Semi-transparent stain: shows the wood grain while still guarding against sun and moisture, and it’s the right call for most residential fences
- Semi-solid or solid stain/paint: hides more of the grain but offers the longest stretch between coats
Pick a dry stretch of at least 24 hours with temperatures between 50°F and 80°F. Apply with a sprayer and back-brush it into the grain, and give end grain on posts and rail tops a second coat since it soaks up moisture the fastest.
Recoat timing depends on species. Cedar and redwood typically go 2 to 3 years between coats, while pressure-treated pine needs attention every 1 to 2 years because it’s more porous. Lowe’s puts general restaining intervals at every 2 to 3 years, with painted fences stretching to 3 to 5 years depending on the product line.
Repairing Wood Fence Damage: What You Can Fix vs. What Needs Replacement
Most fence damage is localized, and a lot of it is a Saturday-afternoon job. Swapping a cracked board means pulling the old fasteners, cutting a replacement to match, and securing it with galvanized or stainless screws, never standard nails that back out over time. Loose hardware usually just needs longer screws driven into fresh wood, not the same stripped holes.
A leaning post is trickier but often fixable if the concrete footing underneath is still solid. You can typically brace it back to plumb with a temporary support, then anchor it with a galvanized post bracket instead of resetting the whole footing.
Replacement, not repair, is the right call when you see:
- Rot at the base of multiple posts rather than just one
- More than about 30% of the boards cracked, warped, or soft
- The fence leaning consistently across its full length, not just one section
- Structural framing (rails, not just face boards) that’s compromised
For anything involving structural post work or a full section replacement, get a second opinion before you start. Our fence repair cost guide breaks down what typical repairs run, and it’s worth comparing that against full replacement pricing before committing to a patch job that won’t hold. Gate sag specifically has its own fix path worth checking before you touch the posts, covered in our sagging gate guide.
Stopping Post Rot Before It Starts
Post rot at ground level is the single biggest reason wood fences fail early, and it’s almost always a moisture problem, not a wood-quality problem. Pressure-treated lumber resists rot better than untreated wood, but treatment isn’t a guarantee, which is exactly why that ground-level zone needs yearly eyes on it regardless of what the post is made from.
A few retrofits pay for themselves:
- Slope a concrete crown away from each post so water runs off instead of pooling against the wood
- Add a gravel base beneath posts set in concrete to let water drain instead of sitting against end grain
- Use metal post brackets or steel posts with wood panels to keep wood entirely off the ground
- Install post caps to shed rain off the most vulnerable exposed cut
Pro Tip: If you’re already dealing with one rotted post, retrofit the rest of the fence line with brackets or better drainage while you’re at it. Waiting until each post fails individually costs more over time than fixing the drainage problem once.
Your Wood Fence Maintenance Schedule at a Glance
You don’t need a complicated system, just consistency. Here’s the timeline that keeps a fence looking good and structurally sound:
- Months 0 to 6 (new fence): Let the wood dry, run the water-absorption test, then apply the first coat of stain or sealer.
- Every year, spring or fall: Walk the fence line, push-test posts, check hardware, and note any boards that need attention.
- Every year: Clean with an oxygen-bleach solution and rinse thoroughly.
- Every 1 to 2 years: Recoat pressure-treated pine fences.
- Every 2 to 3 years: Recoat cedar or redwood fences.
- After major storms or heavy snow: Check for leaning sections, snapped boards, and pooling water at post bases before it refreezes or soaks in.
Bookmark this list. A fence that gets this level of attention rarely needs anything beyond routine upkeep.
Who’s Behind This Guide
Action Fence and Deck has built and repaired residential wood fences for over 20 years, and our crews are licensed and insured for both installation and repair work. We also handle pressure washing as a standalone service, which comes up often once homeowners realize how much cleaning affects a stain job’s lifespan.
If you’re facing structural post replacement, rot on multiple posts, or a fence that needs a full rebuild, that’s professional territory. We provide free quotes so you know the real cost before committing either way.
Keeping Termites, Carpenter Ants, and Other Wood Pests Off Your Fence
Wood-boring insects target moisture-damaged wood first, which is another reason the post-rot prevention above matters so much. Termites don’t need to see daylight to reach your fence. Subterranean termites travel through soil and can enter posts below the surface, so a clean-looking fence above ground doesn’t rule them out. Carpenter ants don’t eat wood the way termites do, but they tunnel through it to build nests, and they specifically favor wood that’s already softened by moisture.
Look for these signs during your regular inspection: small pencil-sized holes with fine sawdust (frass) beneath them, mud tubes running up post bases (a termite calling card), or a hollow sound when you tap a board that should be solid. Winged swarmers near the fence in spring are also worth noting, since that’s often when termite colonies send out new members to start fresh nests.
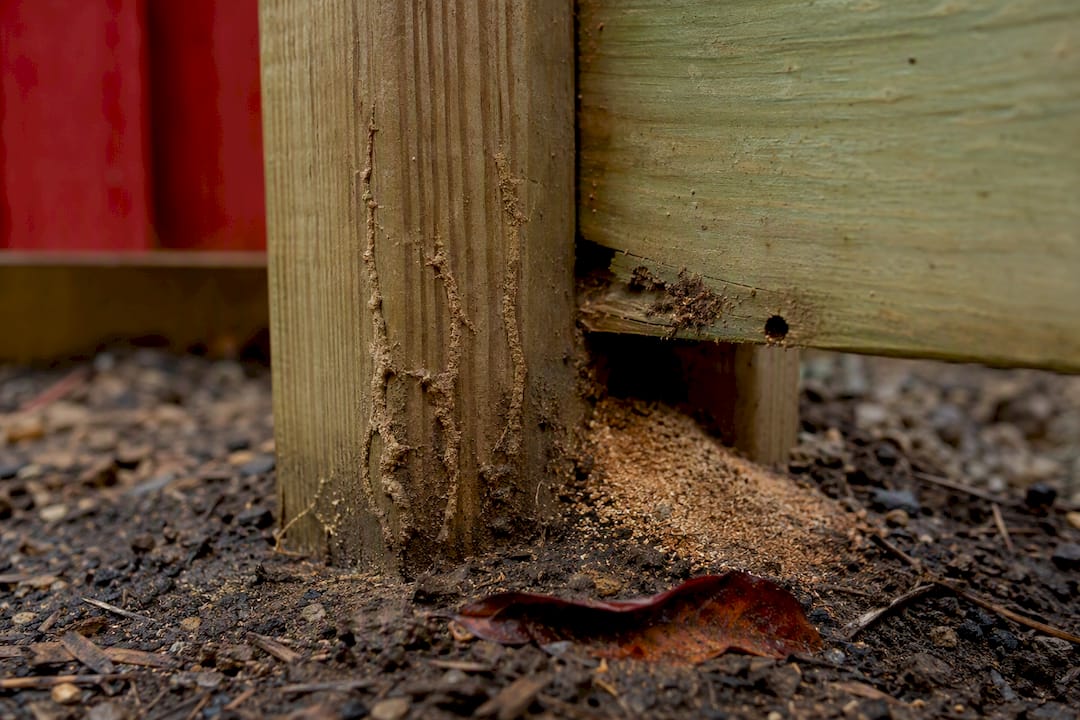
Prevention overlaps almost entirely with rot prevention, which is convenient. Keeping wood dry and off direct soil contact removes the moisture that attracts both pests. Avoid stacking firewood, mulch, or soil against fence posts, since all three hold moisture against the wood and give insects an easy bridge. Pressure-treated lumber includes insecticidal compounds that make it less appealing to termites and ants than untreated wood, but it’s not permanent immunity, especially at cut ends where the treatment doesn’t fully penetrate.
If you spot active infestation, especially termite mud tubes or extensive galleries inside a post, that’s a call to a licensed pest control company, not a DIY fix. Localized insect damage on a single board can often be replaced along with your other repairs, but a colony established in multiple posts usually means treating the soil around the fence line, not just the wood itself.
Handling Mold, Mildew, and Algae Buildup
Green or black discoloration on a wood fence is almost always mildew, algae, or mold rather than rot itself, though left long enough it invites rot by holding moisture against the surface. Mildew tends to show up as gray or black speckling, while algae leaves a greenish film, most common on the shaded, north-facing side of a fence where the wood stays damp longer after rain.
The same oxygen-bleach cleaning routine covered earlier handles all three. What matters more than the product is timing and follow-through: clean at the first sign of discoloration rather than waiting for it to spread, since established mildew colonies get harder to fully remove the longer they sit. A stiff nylon brush works the solution into the wood grain where spores actually live, not just the surface.
Shaded, low-airflow sections of fence line, ones tucked behind shrubs or under tree cover, will need cleaning more often than sections that get full sun and open air. If one section of your fence consistently grows mildew faster than the rest, that’s usually a drainage or airflow problem worth solving rather than just a cleaning problem to repeat forever. Trimming back vegetation that touches the fence helps the wood dry faster after rain, which cuts down on how often mildew has a chance to take hold in the first place.
Sealing after cleaning adds a real layer of defense here too. A quality sealer or stain reduces how much moisture the wood absorbs in the first place, which means less standing dampness for mold and algae to feed on between cleanings.
Staying Safe With Chemicals and Pressure Washers
Oxygen bleach is gentler on wood than chlorine bleach, but it’s still a chemical cleaner, and it deserves the same basic precautions as any other. Wear rubber gloves and eye protection when mixing and applying it, and keep pets and kids away from the fence line until it’s fully rinsed. Cover or relocate nearby plants before spraying, since runoff can affect grass and garden beds even with a plant-safer formula.
Pressure washers cause more DIY injuries than most homeowners expect, mostly from underestimating how much force even a consumer-grade unit puts out. That stream can break skin at close range, which is exactly why the 12-inch minimum distance and PSI cap matter beyond just protecting the wood. Keep the nozzle moving at all times, never point it at yourself or anyone else, and never use a gas-powered pressure washer in an enclosed space because of carbon monoxide risk.
Ladders and elevated sections of fence add another layer of risk during cleaning or staining. Keep three points of contact when working above ground level, and never lean a ladder against the fence itself since the structure isn’t built to bear that kind of side load.
If any of this sounds like more equipment and risk than you want to take on, pressure washing done by a contractor is a straightforward way to skip the learning curve on technique, and it often costs less than replacing boards damaged by an overly aggressive DIY pass. That’s a real trade off worth weighing before you buy or rent equipment for a once-a-year job.
Which Wood Type Actually Holds Up Best?
The wood you start with sets the ceiling on how easy maintenance will be for the life of the fence. Cedar and redwood contain natural oils that resist rot and insects without chemical treatment, which is why they’re the go-to choice for homeowners who want a lower-maintenance fence and don’t mind paying more upfront. Both also take stain evenly and hold color longer between recoats than treated pine.
Pressure-treated pine costs less initially and resists rot thanks to the chemical treatment process, but it’s more porous than cedar or redwood, which is why it needs restaining every 1 to 2 years instead of every 2 to 3. It’s also prone to more visible warping and checking (surface cracking) as it dries out over its first year in place.
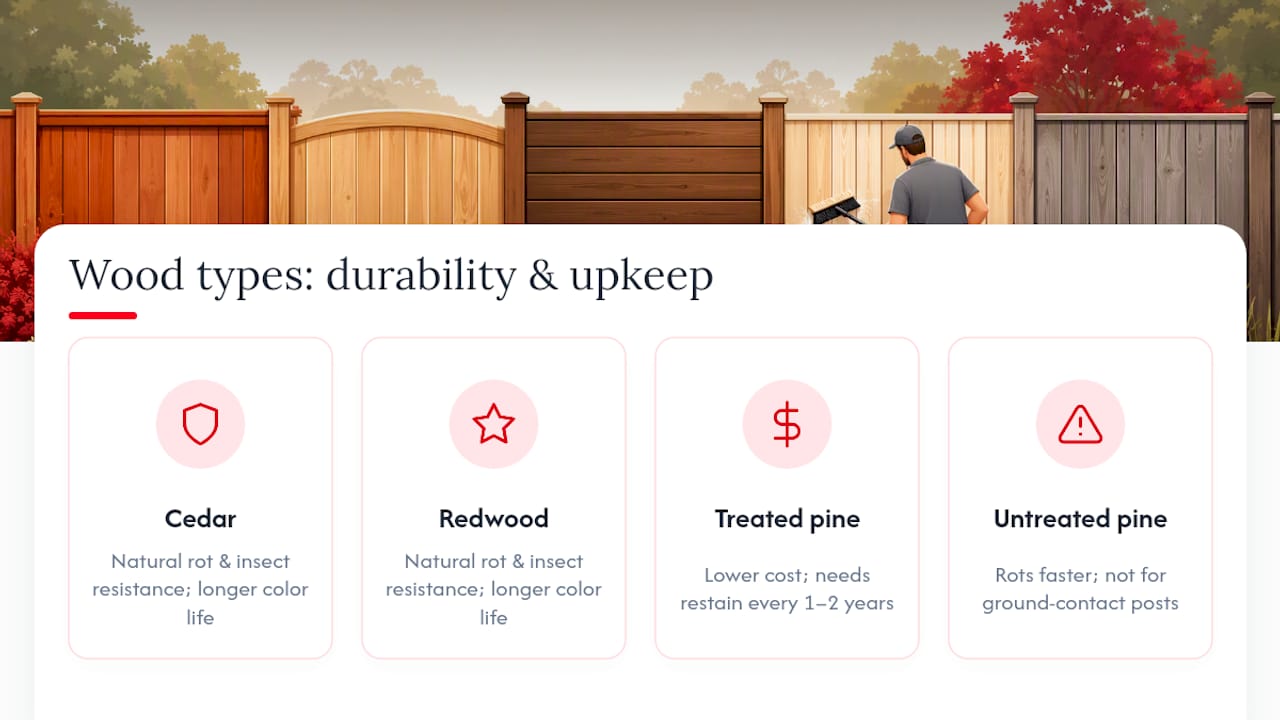
Untreated pine or fir shows up occasionally in budget builds, but it rots significantly faster without treatment or a rigorous sealing schedule, and it’s not a wood type Action Fence and Deck recommends for ground-contact posts under any circumstances. If cost is the deciding factor, treated posts paired with cedar or pine panels above ground is a common middle path that balances upfront price against long-term upkeep.
Whichever species you choose, the post-to-ground connection matters more than the species itself. A cedar post set directly in soil without a gravel base or bracket will still rot faster than a treated pine post installed with proper drainage.
Sun, Humidity, and Climate: Why Location Changes Your Maintenance Timeline
Two identical fences built the same year can age at completely different rates depending on where they sit. South-facing sections that take direct sun all day fade and dry out faster, which sounds like a moisture problem but is actually the opposite: UV exposure breaks down the wood’s surface fibers and degrades stain pigment faster than shaded sections, sometimes needing a fresh coat a full year ahead of the rest of the fence.
Humid climates create the reverse problem. Consistently damp air keeps wood moisture content elevated, which is exactly the environment mildew, algae, and rot organisms need. Fence lines in the Southeast or Pacific Northwest generally need more frequent cleaning cycles than the same fence would in a dry climate, even on an identical staining schedule.
Freeze-thaw cycles add a mechanical stress that dry climates don’t deal with. Water that soaks into wood grain and then freezes expands and cracks fibers from the inside, which is why northern climates often see more end-grain splitting on post tops and rail ends than southern ones do, even with the same finish applied.
Wind-driven rain hitting one side of a property harder than the other, low spots where water pools after storms, and sprinkler heads that spray directly onto fence boards are all site-specific factors worth accounting for when you’re setting your own inspection and recoat schedule. A fence in a low, damp corner of the yard may need annual attention that the rest of the property can go two years between.
Why Post Protection Beats Everything Else on This List
If there’s one thing homeowners underinvest in, it’s the ground-contact zone on their posts. Staining gets attention because it changes how the fence looks. Post drainage gets ignored because it’s invisible once the dirt goes back over it. That’s backward. A fence with a mediocre stain job and solid drainage at the posts will outlast a beautifully finished fence sitting on soggy, poorly drained footings almost every time.
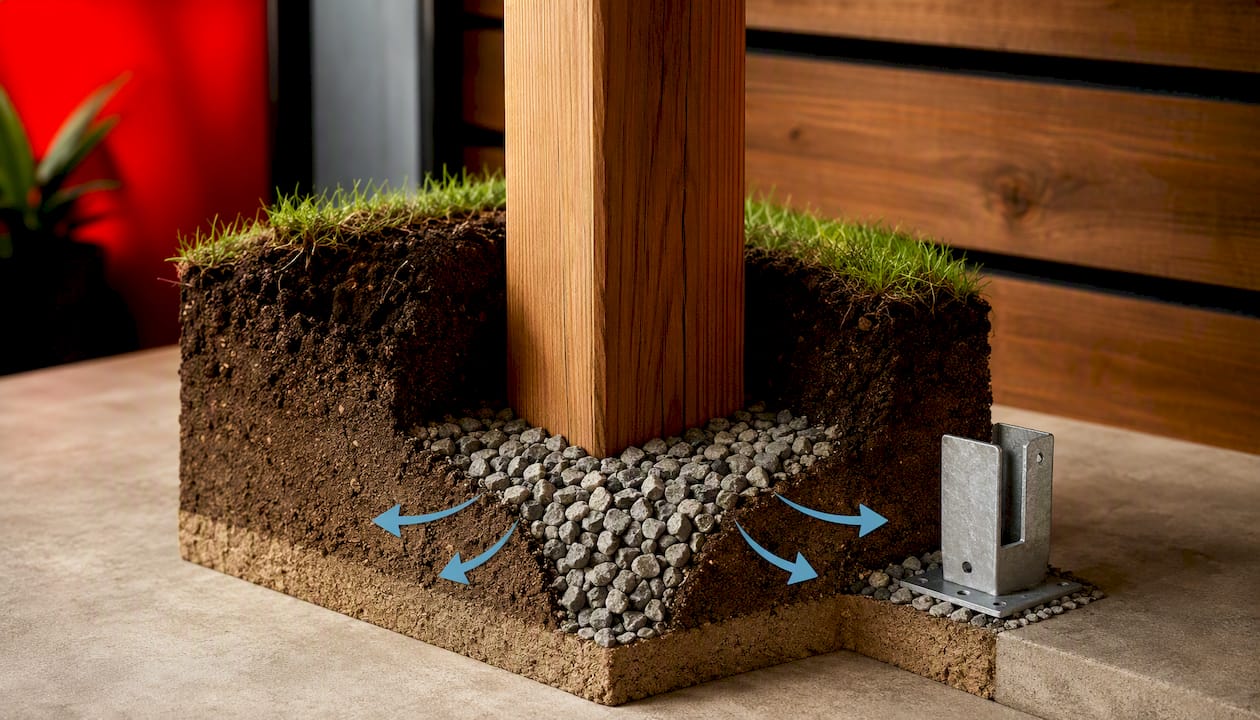
The math on this is simple even without hard numbers: replacing a handful of rotted posts costs a fraction of replacing an entire fence line, and drainage fixes cost less than either. If you only have time or budget for one upgrade this year, put it into gravel bases, sloped concrete crowns, or metal brackets rather than a fancier stain.
We’d rather see homeowners spend an afternoon on inspection and small fixes than watch a fence get replaced five years early because a couple of posts were quietly rotting where nobody was looking. If you’re not sure whether your fence needs a repair or a full rebuild, that’s exactly the kind of call worth getting a professional opinion on before you spend money in the wrong place. Action Fence and Deck offers free quotes for exactly that reason.
— Abraham
Need a Hand? Action Fence and Deck Handles the Repairs You’d Rather Not DIY
Some of what’s in this guide is a Saturday project. Resetting a leaning post, replacing rotted sections, or a full re-stain of a large fence line is a different kind of job, one where a mistake costs more than the time you were trying to save. That’s where a local, licensed crew earns its keep.

Action Fence and Deck has handled wood fence repair, resealing, and full replacement for over 20 years, with licensed and insured crews who do this work daily instead of once a year. If your posts are showing rot in more than one spot, or you’re staring at a fence that’s more patch than original board, check our fence repair cost guide to see what a realistic budget looks like, or compare that against full replacement pricing on our wood fence cost breakdown. Either way, a free quote gets you real numbers instead of guesswork before you decide which route makes sense. Reach out and we’ll take a look.
Sources
- How to Maintain a Wood Fence: Staining, Sealing, Cleaning & Repair
- How To Care For a Wood Fence
- How to Protect a Wood Fence – Lowe’s
FAQ
What Should I Treat My Wood Fence With?
A semi-transparent oil-based stain works well for most residential fences because it protects against UV and moisture while still showing the wood grain, though a clear waterproofer or solid stain can make sense depending on how much color change you want.
Is It a Good Idea to Pressure Wash a Wood Fence?
Yes, as long as you keep the pressure under 2,000 PSI, use a 25-degree tip, and hold the nozzle at least 12 inches from the wood while keeping it moving, since higher pressure or a stationary nozzle can gouge the surface and raise the grain.
How Often Should I Seal My Wooden Fence?
Cedar and redwood fences generally need resealing every 2 to 3 years, while pressure-treated pine should be resealed every 1 to 2 years since it’s more porous and absorbs moisture faster.
What Is the Best Treatment for a Wooden Fence?
For most homeowners, a semi-transparent stain applied after a thorough cleaning gives the best balance of protection and appearance, provided the wood has dried at least 3 to 6 months since installation before that first coat goes on.